By: CS2103-T15-B3 Since: Feb 2018 Licence: MIT
- 1. Setting up
- 2. Design
- 3. Implementation
- 4. Documentation
- 5. Testing
- 6. Dev Ops
- Appendix A: Suggested Programming Tasks to Get Started
- Appendix B: Product Scope
- Appendix C: User Stories
- Appendix D: Use Cases
- Appendix E: Non Functional Requirements
- Appendix F: Glossary
- Appendix G: Product Survey
- Appendix H: Instructions for Manual Testing
1. Setting up
1.1. Prerequisites
-
JDK
1.8.0_60or laterHaving any Java 8 version is not enough.
This app will not work with earlier versions of Java 8. -
IntelliJ IDE
IntelliJ by default has Gradle and JavaFx plugins installed.
Do not disable them. If you have disabled them, go toFile>Settings>Pluginsto re-enable them.
1.2. Setting up the project in your computer
-
Fork this repo, and clone the fork to your computer
-
Open IntelliJ (if you are not in the welcome screen, click
File>Close Projectto close the existing project dialog first) -
Set up the correct JDK version for Gradle
-
Click
Configure>Project Defaults>Project Structure -
Click
New…and find the directory of the JDK
-
-
Click
Import Project -
Locate the
build.gradlefile and select it. ClickOK -
Click
Open as Project -
Click
OKto accept the default settings -
Open a console and run the command
gradlew processResources(Mac/Linux:./gradlew processResources). It should finish with theBUILD SUCCESSFULmessage.
This will generate all resources required by the application and tests.
1.3. Verifying the setup
-
Run the
seedu.address.MainAppand try a few commands -
Run the tests to ensure they all pass.
1.4. Configurations to do before writing code
1.4.1. Configuring the coding style
This project follows oss-generic coding standards. IntelliJ’s default style is mostly compliant with ours but it uses a different import order from ours. To rectify,
-
Go to
File>Settings…(Windows/Linux), orIntelliJ IDEA>Preferences…(macOS) -
Select
Editor>Code Style>Java -
Click on the
Importstab to set the order-
For
Class count to use import with '*'andNames count to use static import with '*': Set to999to prevent IntelliJ from contracting the import statements -
For
Import Layout: The order isimport static all other imports,import java.*,import javax.*,import org.*,import com.*,import all other imports. Add a<blank line>between eachimport
-
Optionally, you can follow the UsingCheckstyle.adoc document to configure Intellij to check style-compliance as you write code.
1.4.2. Updating documentation to match your fork
After forking the repo, links in the documentation will still point to the se-edu/addressbook-level4 repo. If you plan to develop this as a separate product (i.e. instead of contributing to the se-edu/addressbook-level4) , you should replace the URL in the variable repoURL in DeveloperGuide.adoc and UserGuide.adoc with the URL of your fork.
1.4.3. Setting up CI
Set up Travis to perform Continuous Integration (CI) for your fork. See UsingTravis.adoc to learn how to set it up.
After setting up Travis, you can optionally set up coverage reporting for your team fork (see UsingCoveralls.adoc).
| Coverage reporting could be useful for a team repository that hosts the final version but it is not that useful for your personal fork. |
Optionally, you can set up AppVeyor as a second CI (see UsingAppVeyor.adoc).
| Having both Travis and AppVeyor ensures your App works on both Unix-based platforms and Windows-based platforms (Travis is Unix-based and AppVeyor is Windows-based) |
1.4.4. Getting started with coding
When you are ready to start coding,
-
Get some sense of the overall design by reading Section 2.1, “Architecture”.
-
Take a look at Appendix A, Suggested Programming Tasks to Get Started.
2. Design
2.1. Architecture
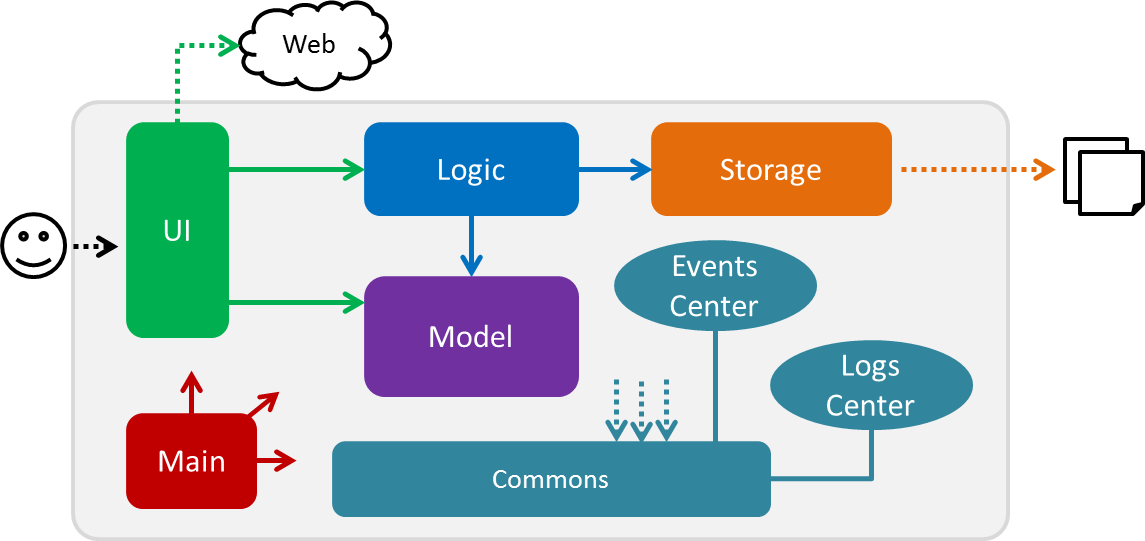
The Architecture Diagram given above explains the high-level design of the App. Given below is a quick overview of each component.
The .pptx files used to create diagrams in this document can be found in the diagrams folder. To update a diagram, modify the diagram in the pptx file, select the objects of the diagram, and choose Save as picture.
|
Main has only one class called MainApp. It is responsible for,
-
At app launch: Initializes the components in the correct sequence, and connects them up with each other.
-
At shut down: Shuts down the components and invokes cleanup method where necessary.
Commons represents a collection of classes used by multiple other components. Two of those classes play important roles at the architecture level.
-
EventsCenter: This class (written using Google’s Event Bus library) is used by components to communicate with other components using events (i.e. a form of Event Driven design) -
LogsCenter: Used by many classes to write log messages to the App’s log file.
The rest of the App consists of four components.
Each of the four components
-
Defines its API in an
interfacewith the same name as the Component. -
Exposes its functionality using a
{Component Name}Managerclass.
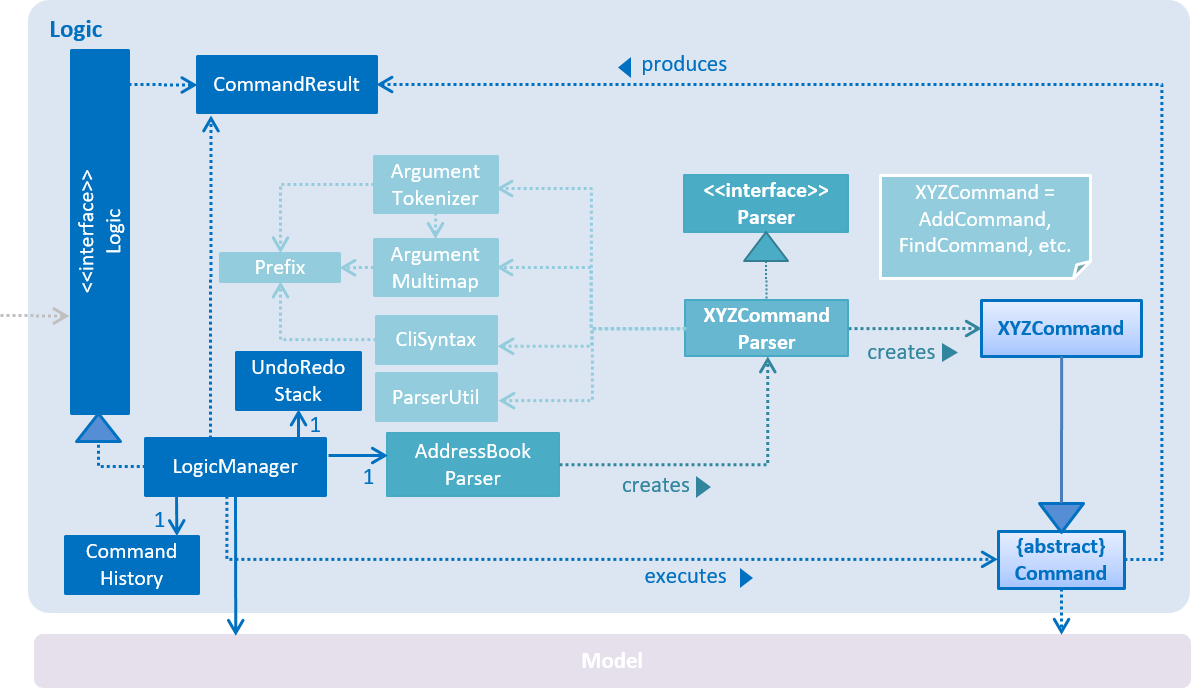
For example, the Logic component (see the class diagram given below) defines it’s API in the Logic.java interface and exposes its functionality using the LogicManager.java class.
Events-Driven nature of the design
The Sequence Diagram below shows how the components interact for the scenario where the user issues the command delete 1.
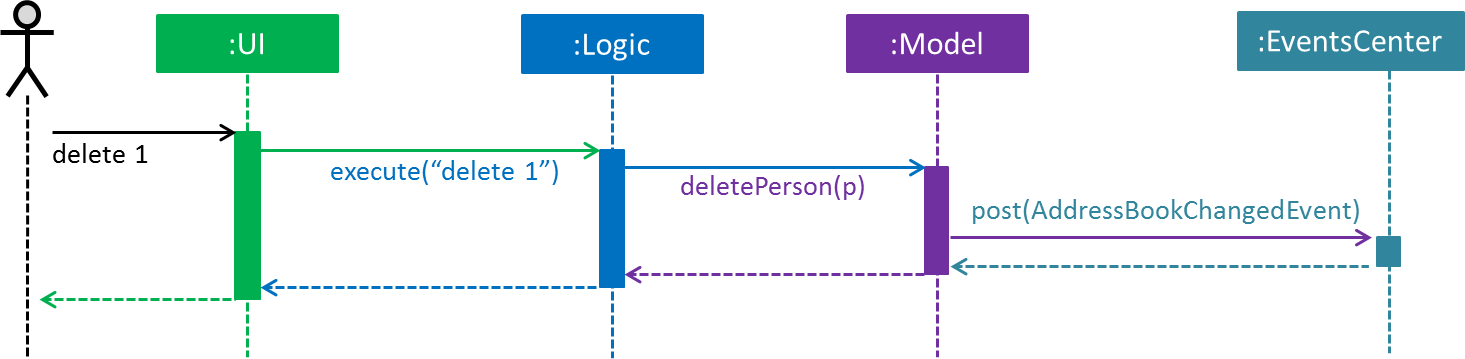
delete 1 command (part 1)
Note how the Model simply raises a AddressBookChangedEvent when the Address Book data are changed, instead of asking the Storage to save the updates to the hard disk.
|
The diagram below shows how the EventsCenter reacts to that event, which eventually results in the updates being saved to the hard disk and the status bar of the UI being updated to reflect the 'Last Updated' time.
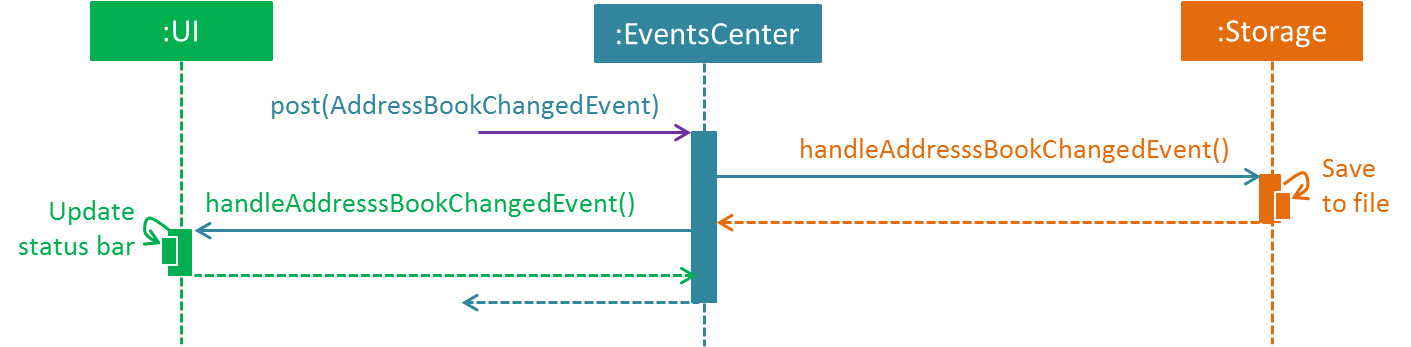
delete 1 command (part 2)
Note how the event is propagated through the EventsCenter to the Storage and UI without Model having to be coupled to either of them. This is an example of how this Event Driven approach helps us reduce direct coupling between components.
|
The sections below give more details of each component.
2.2. UI component
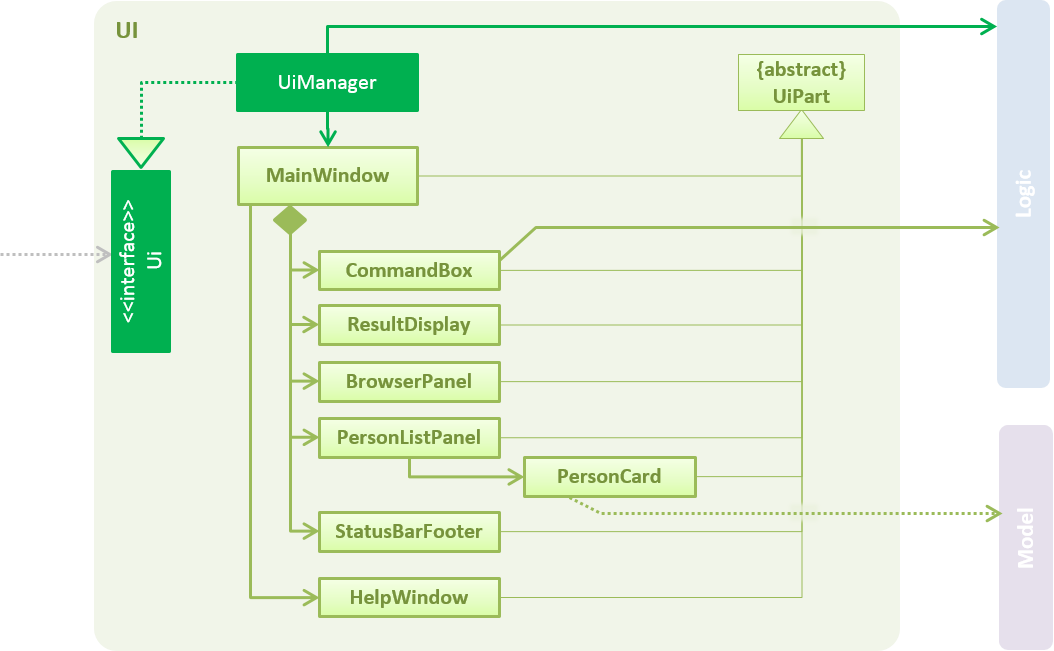
API : Ui.java
The UI consists of a MainWindow that is made up of parts e.g.CommandBox, ResultDisplay, PersonListPanel, StatusBarFooter, BrowserPanel etc. All these, including the MainWindow, inherit from the abstract UiPart class.
The UI component uses JavaFx UI framework. The layout of these UI parts are defined in matching .fxml files that are in the src/main/resources/view folder. For example, the layout of the MainWindow is specified in MainWindow.fxml
The UI component,
-
Executes user commands using the
Logiccomponent. -
Binds itself to some data in the
Modelso that the UI can auto-update when data in theModelchange. -
Responds to events raised from various parts of the App and updates the UI accordingly.
2.3. Logic component
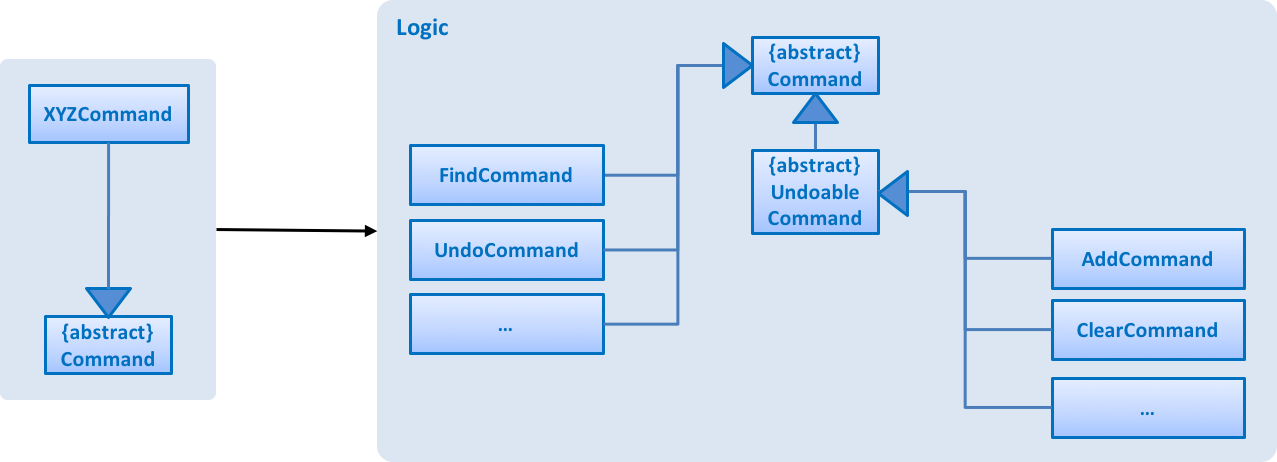
XYZCommand and Command in Figure 6, “Structure of the Logic Component”API :
Logic.java
-
Logicuses theAddressBookParserclass to parse the user command. -
This results in a
Commandobject which is executed by theLogicManager. -
The command execution can affect the
Model(e.g. adding a person) and/or raise events. -
The result of the command execution is encapsulated as a
CommandResultobject which is passed back to theUi.
Given below is the Sequence Diagram for interactions within the Logic component for the execute("delete 1") API call.
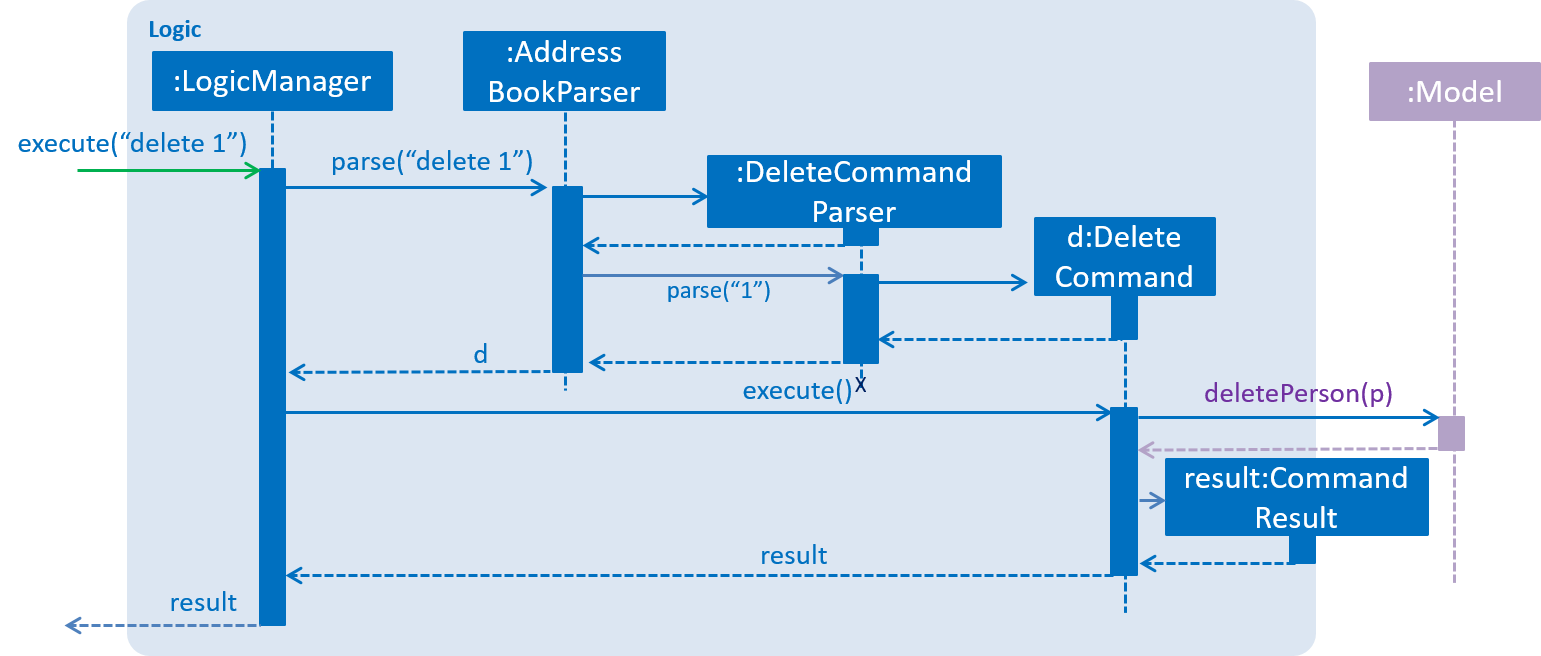
delete 1 Command2.4. Model component
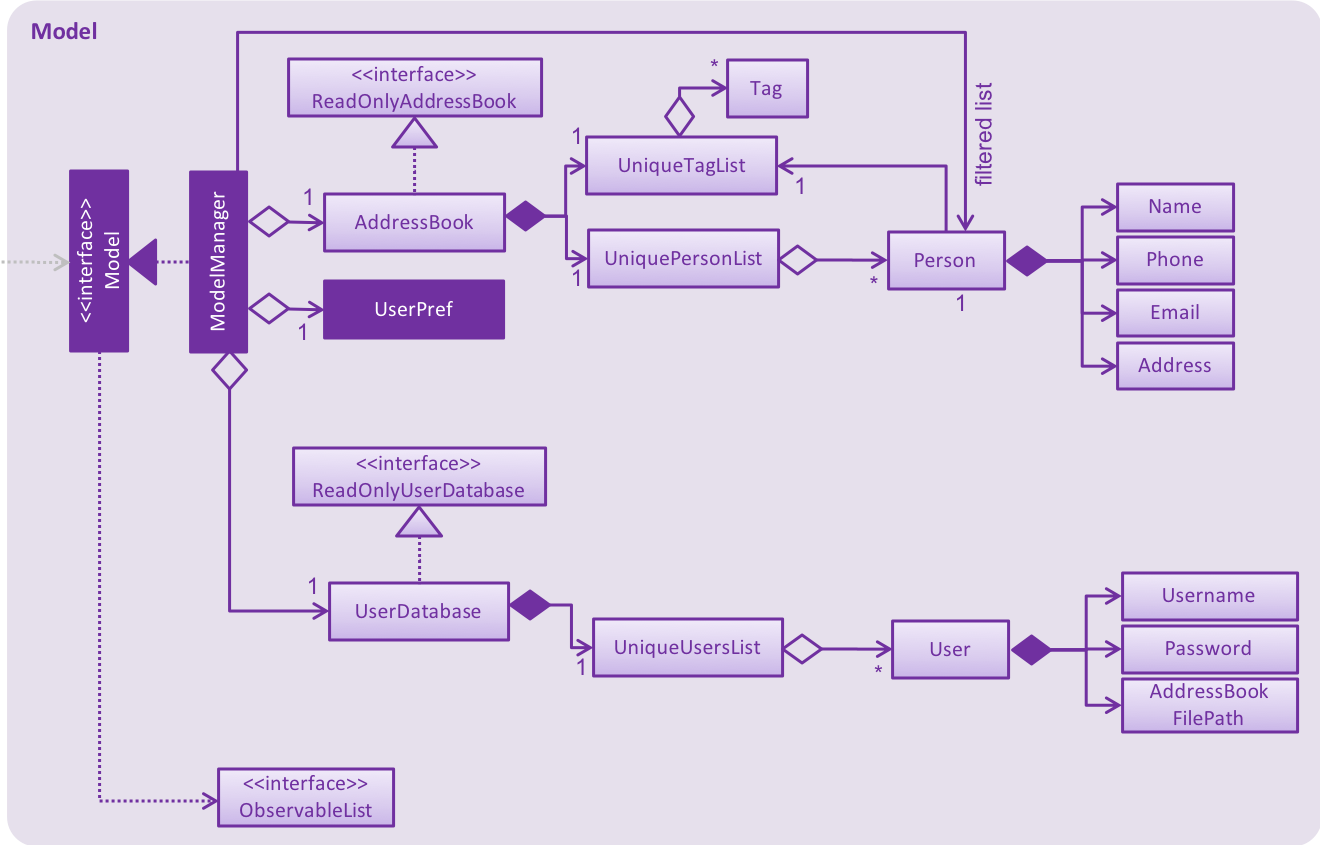
API : Model.java
The Model,
-
stores a
UserPrefobject that represents the user’s preferences. -
stores the Address Book data.
-
exposes an unmodifiable
ObservableList<Person>that can be 'observed' e.g. the UI can be bound to this list so that the UI automatically updates when the data in the list change. -
does not depend on any of the other three components.
2.5. Storage component
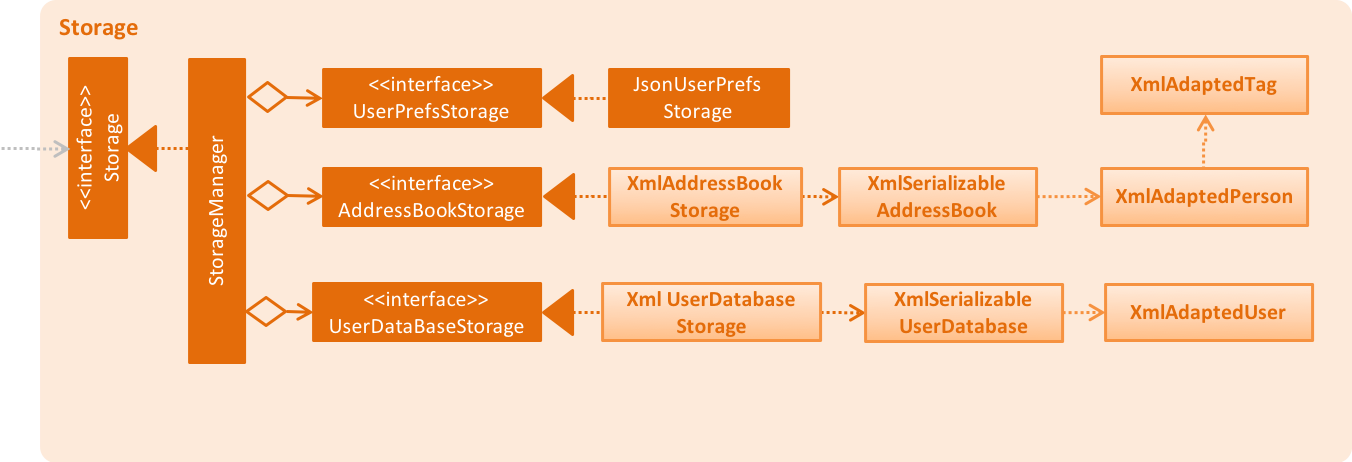
API : Storage.java
The Storage component,
-
can save
UserPrefobjects in json format and read it back. -
can save the Address Book data in xml format and read it back.
-
can save the User Database data in xml format and read it back.
2.6. Common classes
Classes used by multiple components are in the seedu.addressbook.commons package.
3. Implementation
This section describes some noteworthy details on how certain features are implemented.
3.1. Multi-User Feature
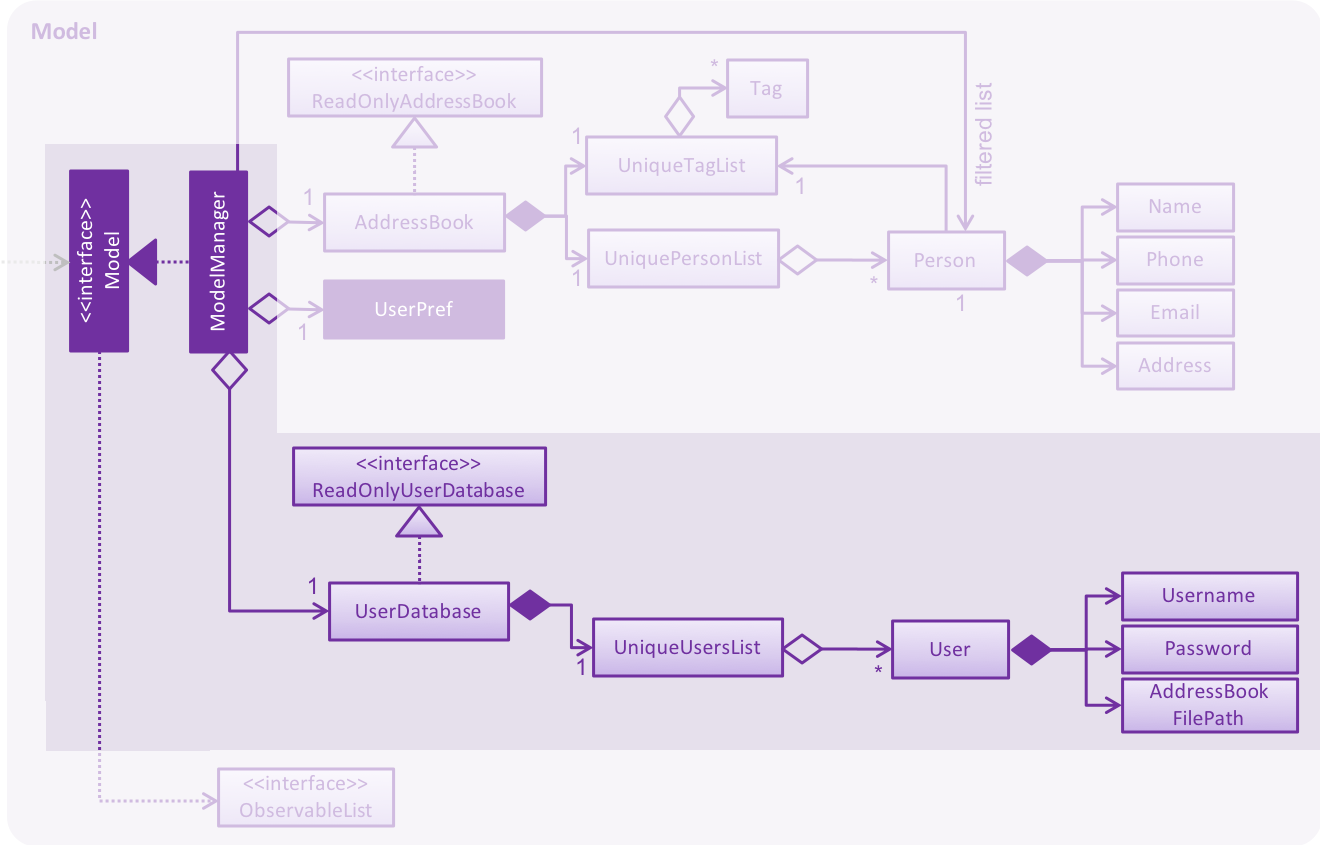
To implement the multi-user feature, where each user has his/her own Address Book, we have added a userDatabase in Model
to store all the available users in the application. The userDatabase is the same architectural level as the addressBook.
A similar storing system used in addressBook is also used for userDatabase where the all the user data is stored in a
single XML file.
3.1.1. Design Considerations for Database
A big design consideration is the architecture in implementing the retrieval and storage of multiple users.
A Possible Design
A possible design was to store users and persons under the same data folder which means encapsulating AddressBook
in a User. In the XML data storage, the Addressbook will be an element of a User; the User Database will then be the root.
Example:
<userdatabase>
    <user>
        <username> user </username>
        <password> pass </password>
        <addressbook>
            <persons>
                <name>John Doe</name>
                <phone>98765432</phone>
                <email>johnd@example.com</email>
                <address>311, Clementi Ave 2, #02-25</address>
                <sessionlogs></sessionlogs>
                <tags>ADHD</tags>
            </persons>
        </addressbook>
    </user>
</userdatabase>
However, this may over-complicate and over populate the data storage file very fast which can grow quite large with many users. Transportation of the data file may be an issue if the file size becomes too big.
Current Implementation
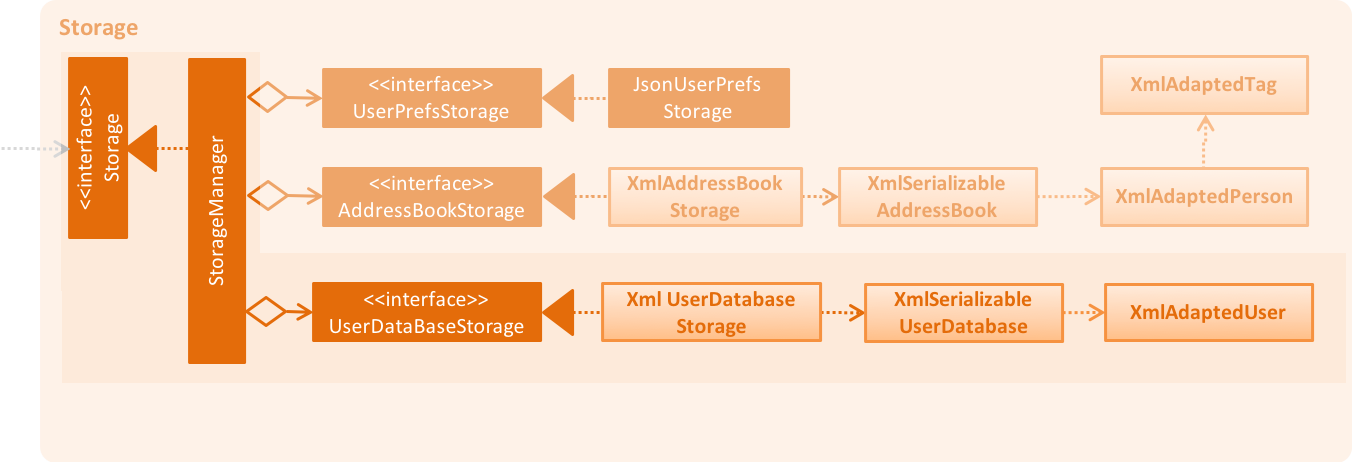
Currently, the User Database mimics the AddressBook classes and instances in the Model and Storage Components.
In terms of storage, the User Database of all users is now collectively stored in one XML data file. (eg. users.xml). The addressbook of each user is now stored in separate XML files. Each addressbook data file is identified in the following format:
addressbook-[USERNAME].xml where [USERNAME] refers to the username of the user
While this can be argued to be bad as there is strong coupling between the user and the addressbook data file, such is fixed as in the absence of the addressbook data file, a sample data file will be created.
Also, there may be a security concern that a side channel information leak because an external party can figure out the number of active users from the number of addressbook files. However, such information is not very useful to conduct an attack on the application.
Other Alternative Designs
Other alternative designs involves external third-party database systems such as SQL or no-SQL databases such as MongoDB.
3.1.2. Deleting User
One thing to highlight about the deleting of user, it also deletes the AddressBook XML data file, hence it cannot be retrieved again. It also prevents users from accessing the file again by creating a user with the same username as the one being deleted.
3.2. Authentication
3.2.1. Current Implementation
User Login
The Login feature involves UI, Logic and Model components. It allows the user to login and logout from the application. When the user is logged out, the user commands are limited, some panels are hidden the user and the viewing of history is disabled. It serves the purpose of maintaining confidentiality of the data in the application.
The LoginCommand is part of Logic component. However it makes use of userDatabase to check for the match in
the username and password input. Below is a sequence diagram of how the feature works.
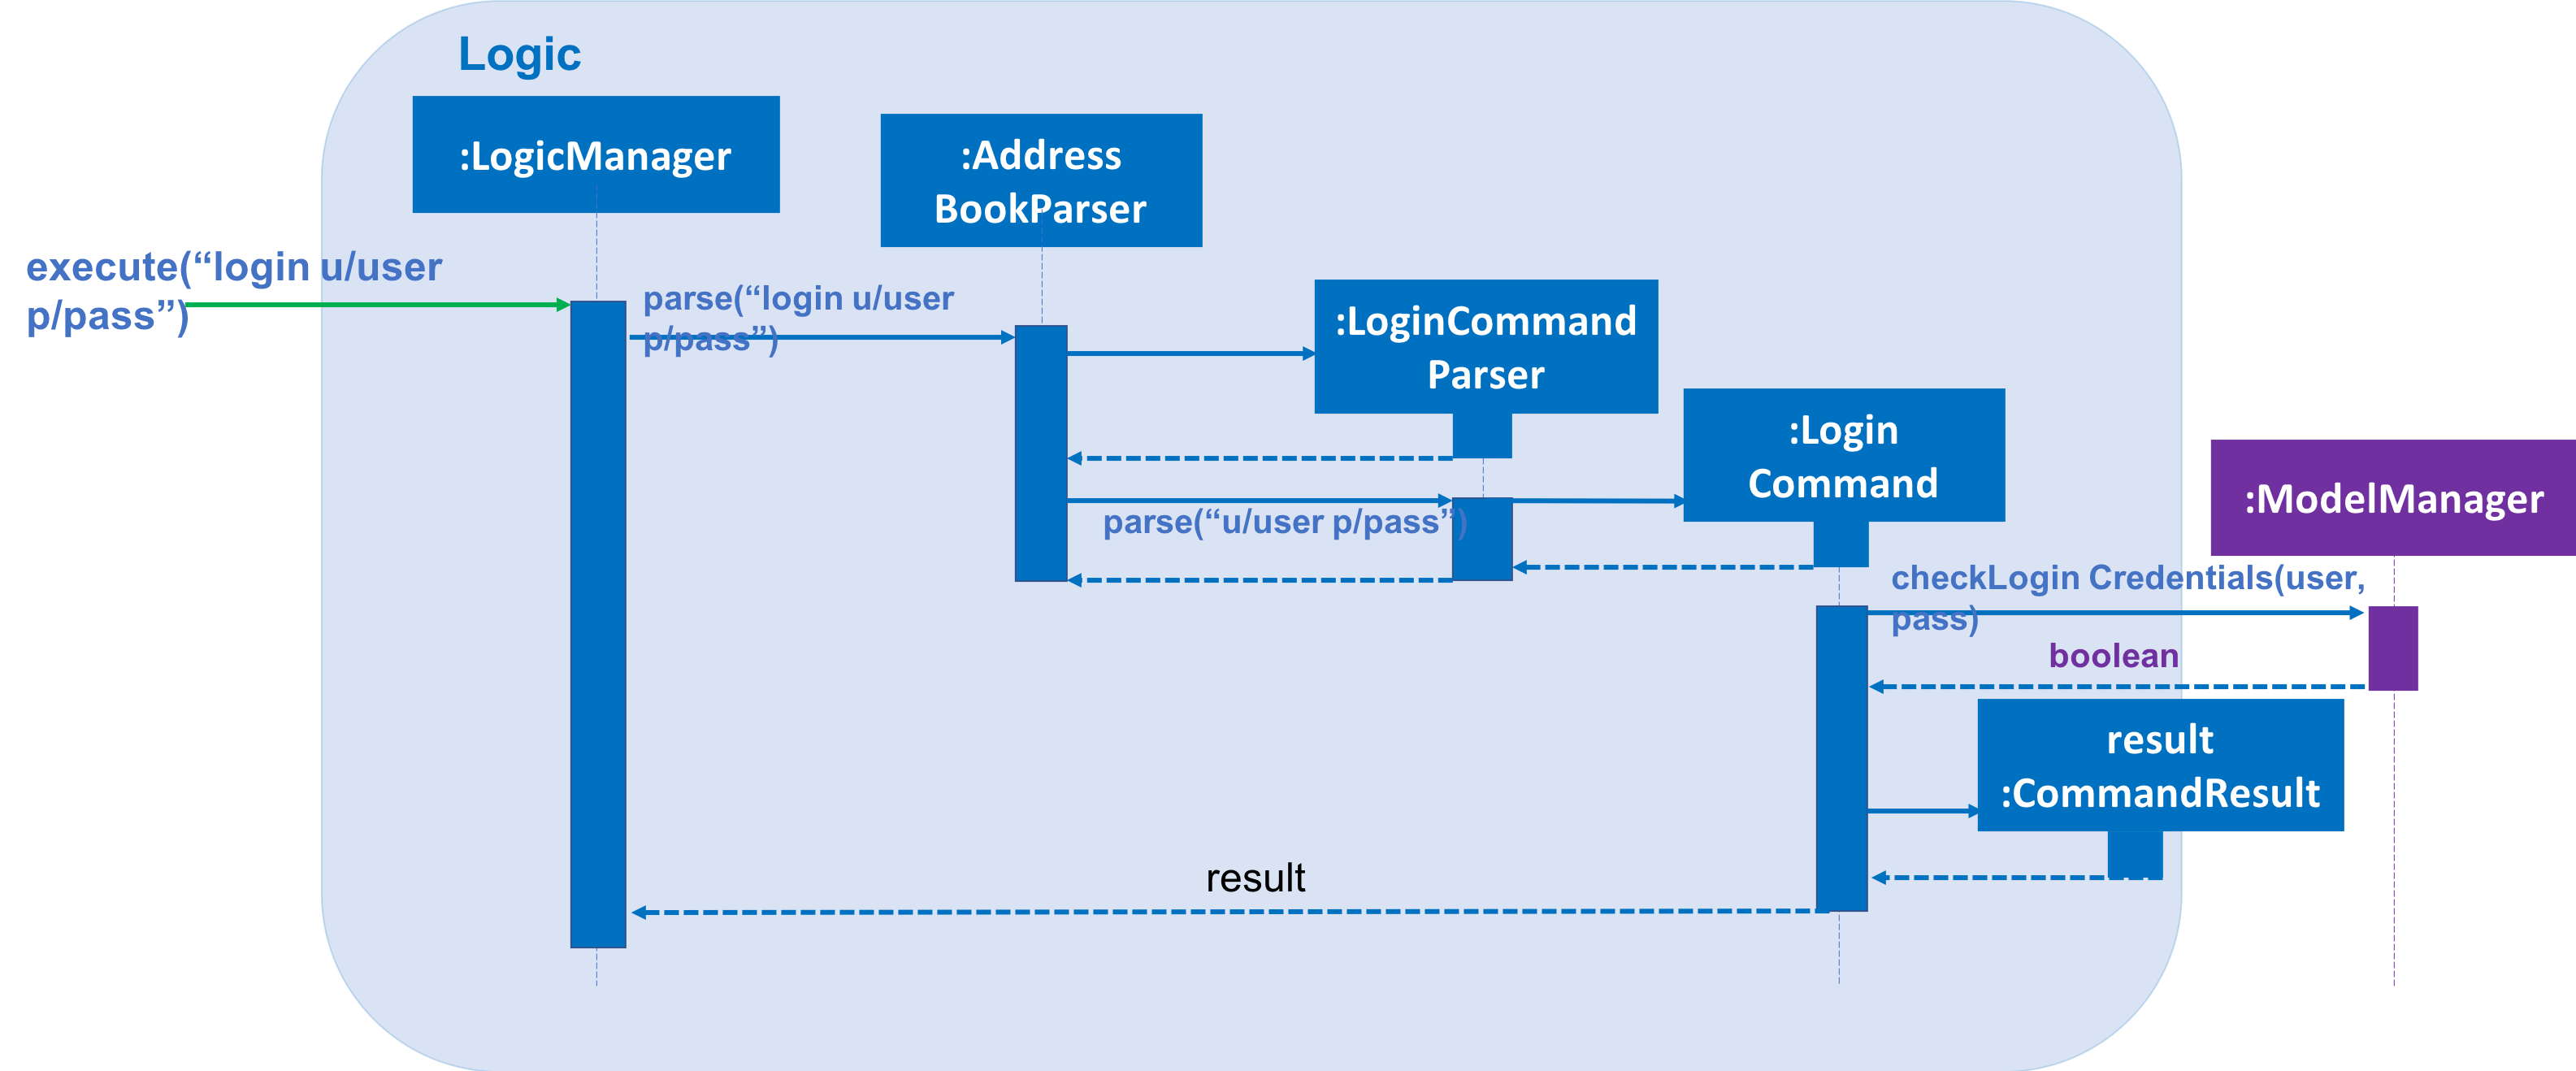
The Login feature involves the UI component as well as we need to know when to hide and show certain panels depending on
whether the user has logged in or not. To maintain our n-tier architecture, we make CommandBox check the login
status upon each command entry to effect the change on the UI. The sequence diagram is as shown below.
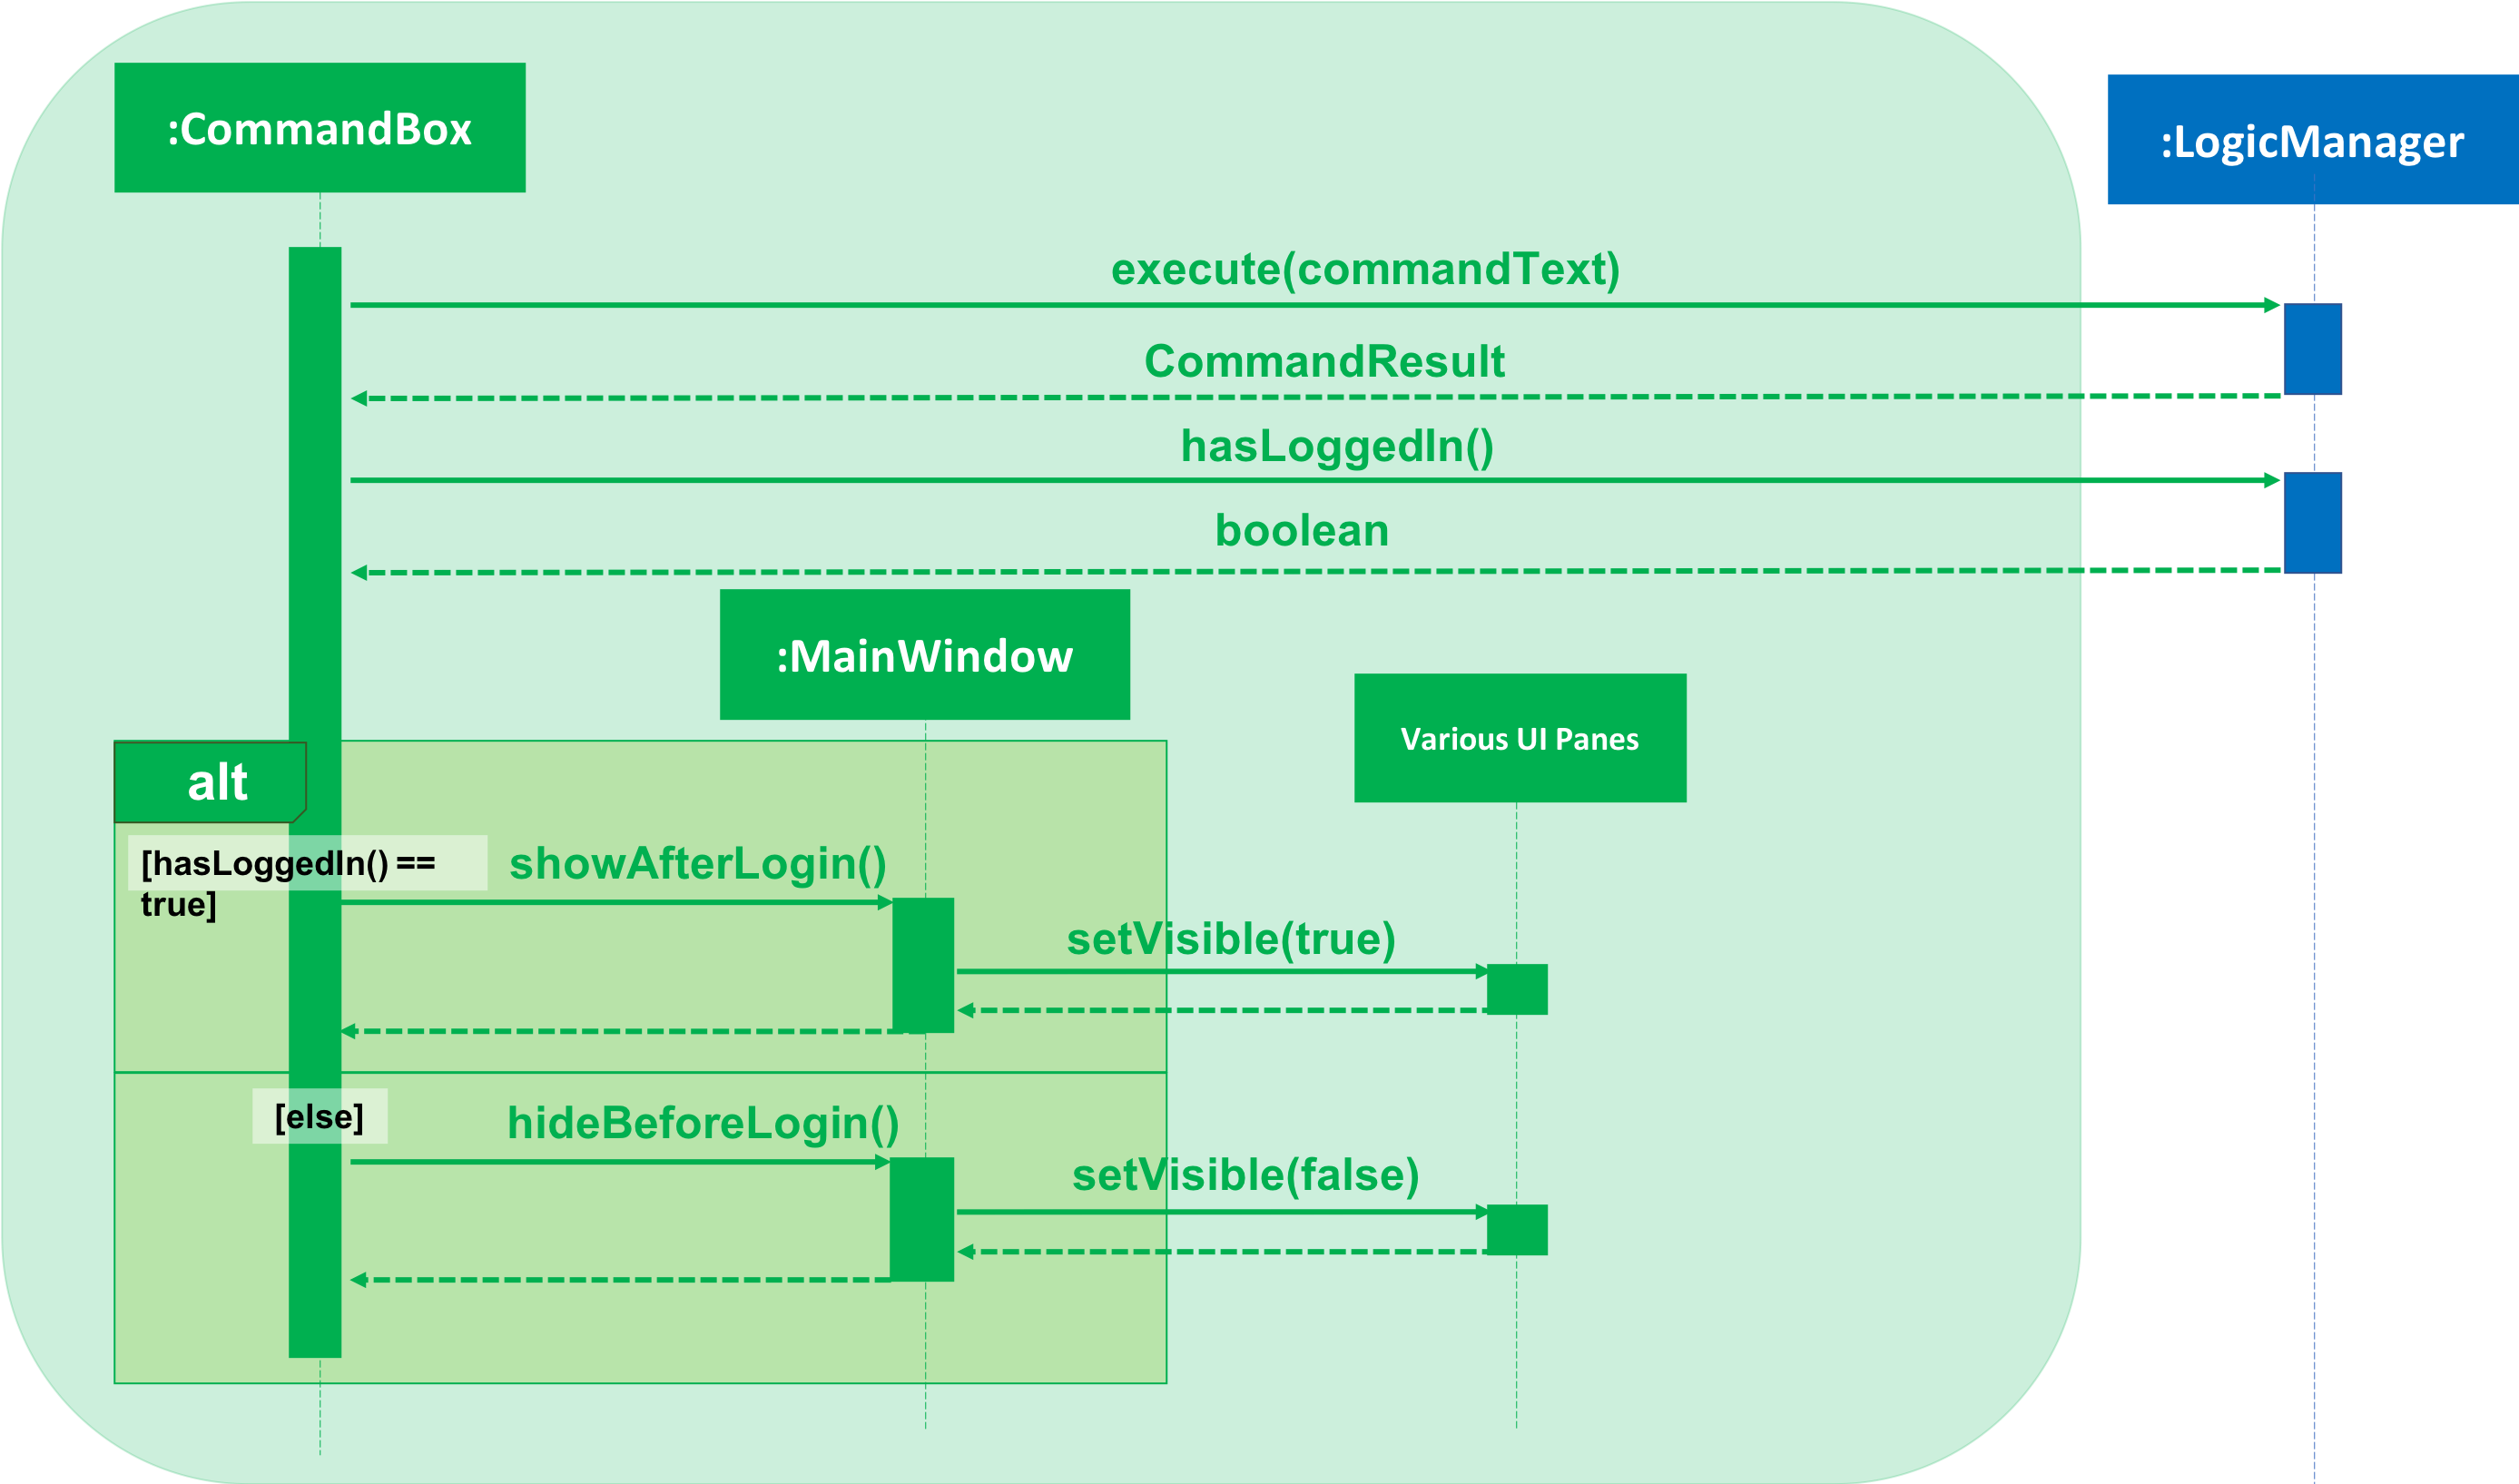
When the user is not logged in, commands that manipulate data in the application will be disabled. To avoid editing
every single command, the invalidity of the command is handled in LogicManager.
User Logout
The logout feature similarly involves the UI, Logic and Model components. It allows the user to log out from the application, securing his data.
The user cannot logout when he/she is not even logged in initially. This is already handled by limiting the availability of commands when the user is logged out.
Similarly, some of the UI panels will be hidden when the user logs out.
User Login Status
To identify the login status of the application and know its the correct user, a login status bar on the top of the window has been implemented. Its shows the status and the user that is logged in.
Example:


3.2.2. Possible enhancements
-
Login UI Box can be implemented before launching the main window
-
Encryption of user file [coming in v2.0]
-
Salting of passwords so that it is not deterministic when hashing/encrypting
-
2-Factor Authentication for login
3.3. Undo/Redo feature
3.3.1. Current Implementation
The undo/redo mechanism is facilitated by an UndoRedoStack, which resides inside LogicManager. It supports undoing and redoing of commands that modifies the state of the address book (e.g. add, edit). Such commands will inherit from UndoableCommand.
UndoRedoStack only deals with UndoableCommands. Commands that cannot be undone will inherit from Command instead. The following diagram shows the inheritance diagram for commands:
As you can see from the diagram, UndoableCommand adds an extra layer between the abstract Command class and concrete commands that can be undone, such as the DeleteCommand. Note that extra tasks need to be done when executing a command in an undoable way, such as saving the state of the address book before execution. UndoableCommand contains the high-level algorithm for those extra tasks while the child classes implements the details of how to execute the specific command. Note that this technique of putting the high-level algorithm in the parent class and lower-level steps of the algorithm in child classes is also known as the template pattern.
Commands that are not undoable are implemented this way:
public class ListCommand extends Command {
    @Override
    public CommandResult execute() {
        // ... list logic ...
    }
}
With the extra layer, the commands that are undoable are implemented this way:
public abstract class UndoableCommand extends Command {
    @Override
    public CommandResult execute() {
        // ... undo logic ...

        executeUndoableCommand();
    }
}

public class DeleteCommand extends UndoableCommand {
    @Override
    public CommandResult executeUndoableCommand() {
        // ... delete logic ...
    }
}
Suppose that the user has just launched the application. The UndoRedoStack will be empty at the beginning.
The user executes a new UndoableCommand, delete 5, to delete the 5th person in the address book. The current state of the address book is saved before the delete 5 command executes. The delete 5 command will then be pushed onto the undoStack (the current state is saved together with the command).

As the user continues to use the program, more commands are added into the undoStack. For example, the user may execute add n/David … to add a new person.
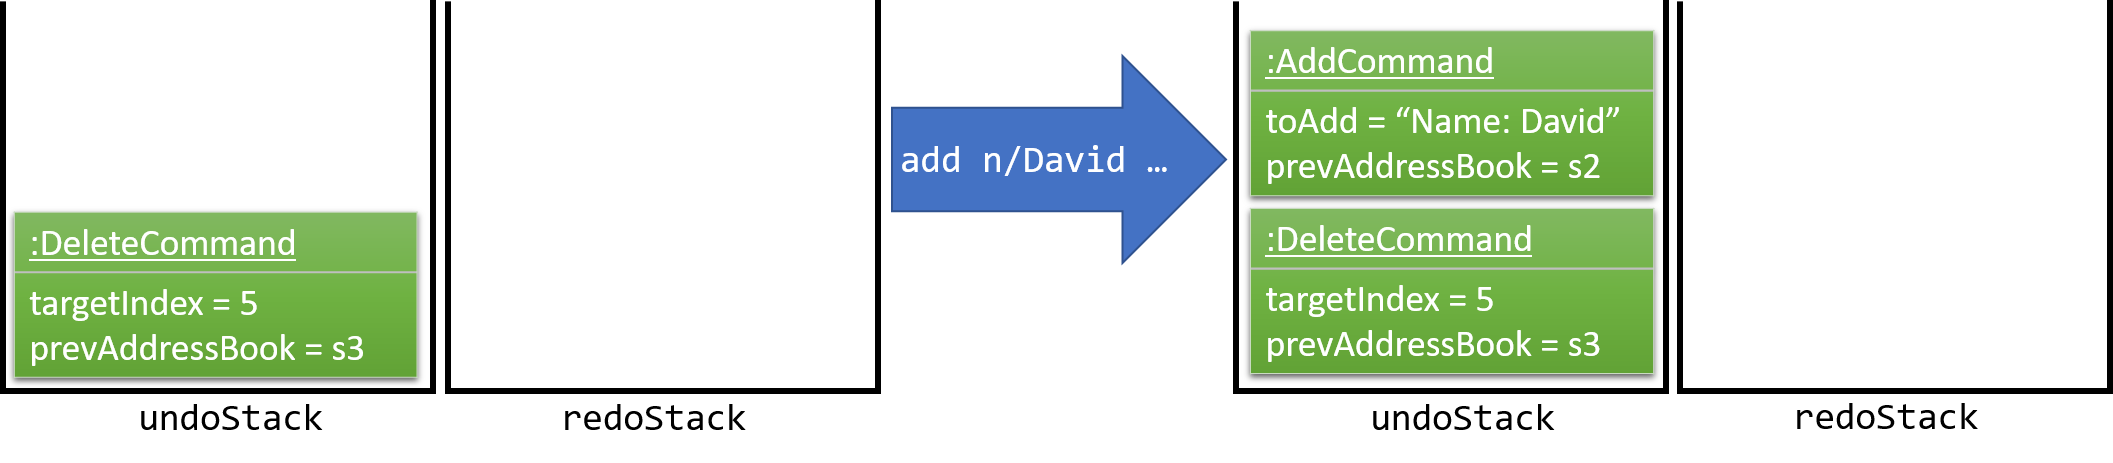
If a command fails its execution, it will not be pushed to the UndoRedoStack at all.
|
The user now decides that adding the person was a mistake, and decides to undo that action using undo.
We will pop the most recent command out of the undoStack and push it back to the redoStack. We will restore the address book to the state before the add command executed.
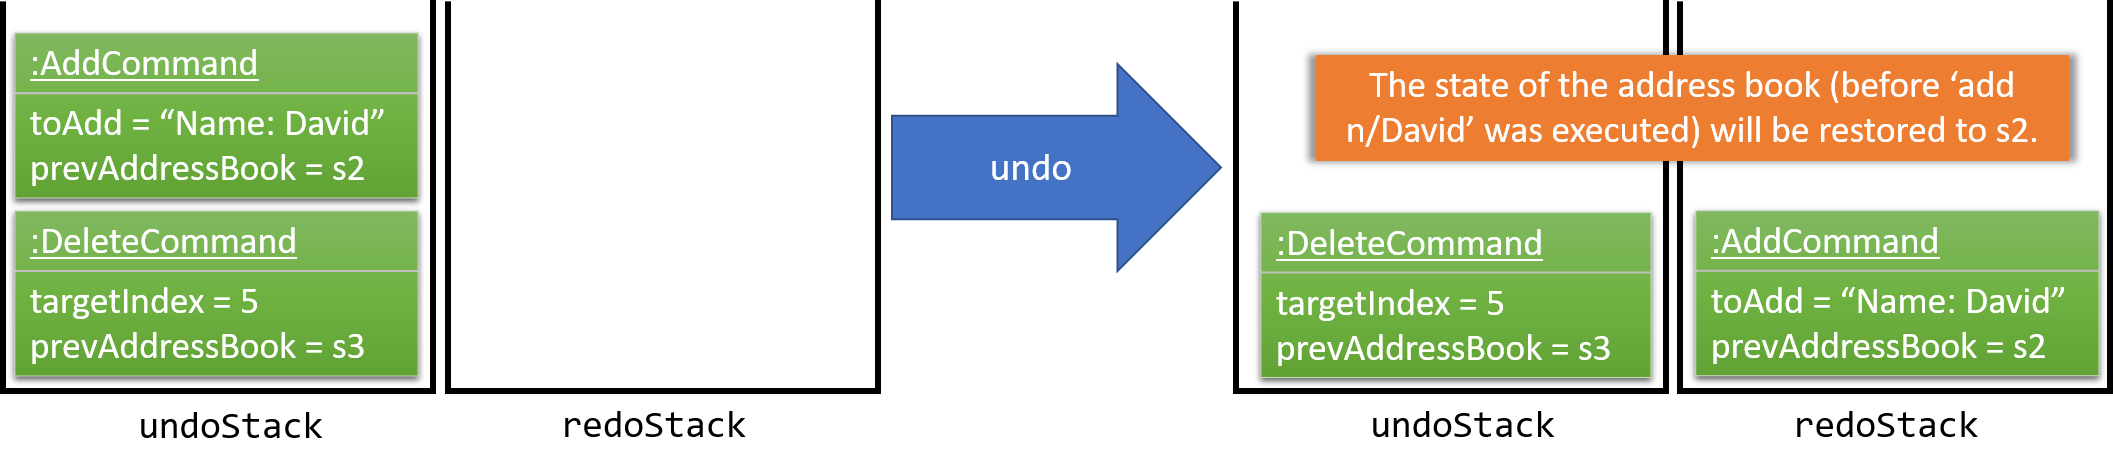
If the undoStack is empty, then there are no other commands left to be undone, and an Exception will be thrown when popping the undoStack.
|
The following sequence diagram shows how the undo operation works:
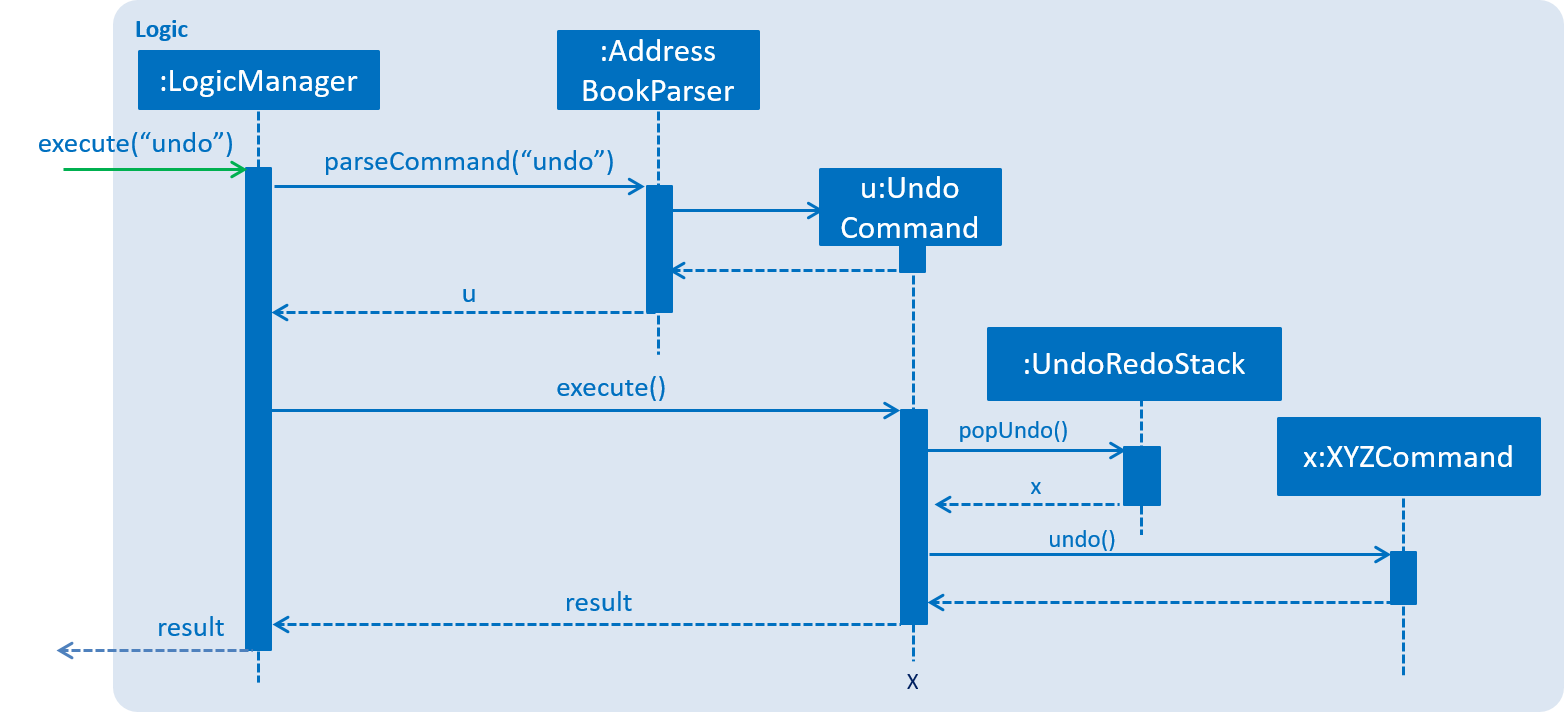
The redo does the exact opposite (pops from redoStack, push to undoStack, and restores the address book to the state after the command is executed).
If the redoStack is empty, then there are no other commands left to be redone, and an Exception will be thrown when popping the redoStack.
|
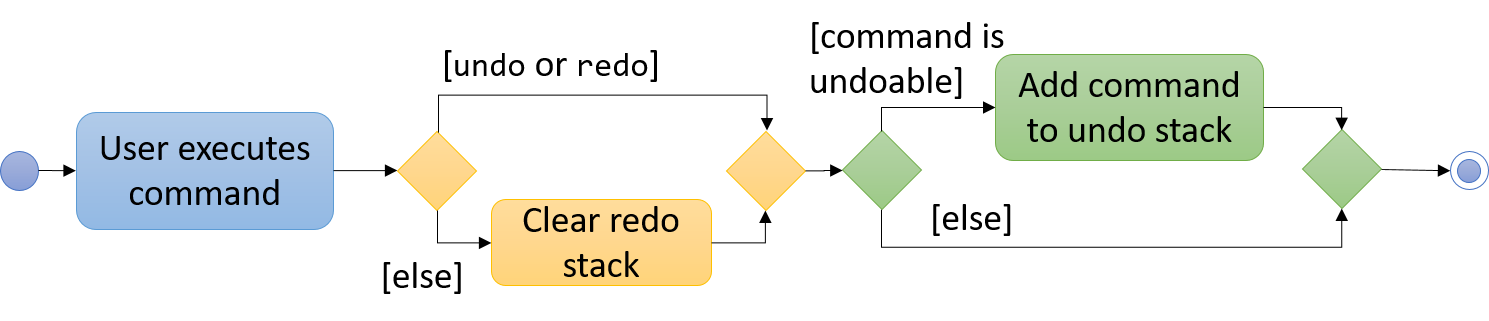
The user now decides to execute a new command, clear. As before, clear will be pushed into the undoStack. This time the redoStack is no longer empty. It will be purged as it no longer make sense to redo the add n/David command (this is the behavior that most modern desktop applications follow).

Commands that are not undoable are not added into the undoStack. For example, list, which inherits from Command rather than UndoableCommand, will not be added after execution:

The following activity diagram summarize what happens inside the UndoRedoStack when a user executes a new command:
3.3.2. Design Considerations
Aspect: Implementation of UndoableCommand
-
Alternative 1 (current choice): Add a new abstract method
executeUndoableCommand()-
Pros: We will not lose any undone/redone functionality as it is now part of the default behaviour. Classes that deal with
Commanddo not have to know thatexecuteUndoableCommand()exist. -
Cons: Hard for new developers to understand the template pattern.
-
-
Alternative 2: Just override
execute()-
Pros: Does not involve the template pattern, easier for new developers to understand.
-
Cons: Classes that inherit from
UndoableCommandmust remember to callsuper.execute(), or lose the ability to undo/redo.
-
Aspect: How undo & redo executes
-
Alternative 1 (current choice): Saves the entire address book.
-
Pros: Easy to implement.
-
Cons: May have performance issues in terms of memory usage.
-
-
Alternative 2: Individual command knows how to undo/redo by itself.
-
Pros: Will use less memory (e.g. for
delete, just save the person being deleted). -
Cons: We must ensure that the implementation of each individual command are correct.
-
Aspect: Type of commands that can be undone/redone
-
Alternative 1 (current choice): Only include commands that modifies the address book (
add,clear,edit).-
Pros: We only revert changes that are hard to change back (the view can easily be re-modified as no data are * lost).
-
Cons: User might think that undo also applies when the list is modified (undoing filtering for example), * only to realize that it does not do that, after executing
undo.
-
-
Alternative 2: Include all commands.
-
Pros: Might be more intuitive for the user.
-
Cons: User have no way of skipping such commands if he or she just want to reset the state of the address * book and not the view. Additional Info: See our discussion here.
-
Aspect: Data structure to support the undo/redo commands
-
Alternative 1 (current choice): Use separate stack for undo and redo
-
Pros: Easy to understand for new Computer Science student undergraduates to understand, who are likely to be * the new incoming developers of our project.
-
Cons: Logic is duplicated twice. For example, when a new command is executed, we must remember to update * both
HistoryManagerandUndoRedoStack.
-
-
Alternative 2: Use
HistoryManagerfor undo/redo-
Pros: We do not need to maintain a separate stack, and just reuse what is already in the codebase.
-
Cons: Requires dealing with commands that have already been undone: We must remember to skip these commands. Violates Single Responsibility Principle and Separation of Concerns as
HistoryManagernow needs to do two * different things.
-
3.4. [Proposed] Data Encryption
Proposed Implementation
Basing on the current storage architecture, we could implement a FileEncryption class to handle both the encryption and
decryption when storing and retrieving the data files.
-
For User Database
Information in the user database that needs to be encrypted is the username and password. Hashing is a good encryption scheme to use, a two-way encryption scheme is not needed here because we only need to check the validity of the username and password. -
For Address Book
AddressBook data files require a two-way encryption scheme as the information needs to be read when the application initialises. A symmetric key encryption scheme is more suitable here than public key encryption scheme because less information needs to be stored. Also, it is easy when we can use the username as the symmetric key in the encryption scheme. Some possible schemes are AES or CBC.
3.5. Google Calendar Integration
Command line and graphical integration with Google Calendar from within SLAP. This assumes that the user already uses Google Calendar to manage their events.
3.5.1. Proposed Implementation
Aspect: GUI
The GUI portion of this feature will be a WebView of the Google Calendar web application. The user will have the option to either open their calendar as a new floating window by pressing the F8 function key or by clicking View > Open Calendar or as a scene within the main SLAP GUI by invoking the calendar command. In either case, the WebView will be instantiated as a new JavaFX scene and take advantage of Java’s build in WebView/WebEngine. This will allow the user to interact with the familiar Google Calendar web interface without any loss of functionality.
Aspect: CLI
The CLI portion of this feature will rely on Google’s Calendar API that uses the OAuth 2.0 protocol to allow an application (such as SLAP) to directly read/write to a user’s calendar, provided that they have given them access to the calendar. Once a user has authorized the application to read/write to their calendar, they will gain access to the the following commands: event-add, event-delete, and event-edit. The Oauth authentication process will be entirely handled by Google with the only requirement being that the user must log in to their calendar using the GUI interface.
A check will eventually be added to ensure that the user has already logged in before attempting to execute any of the aforementioned commands.
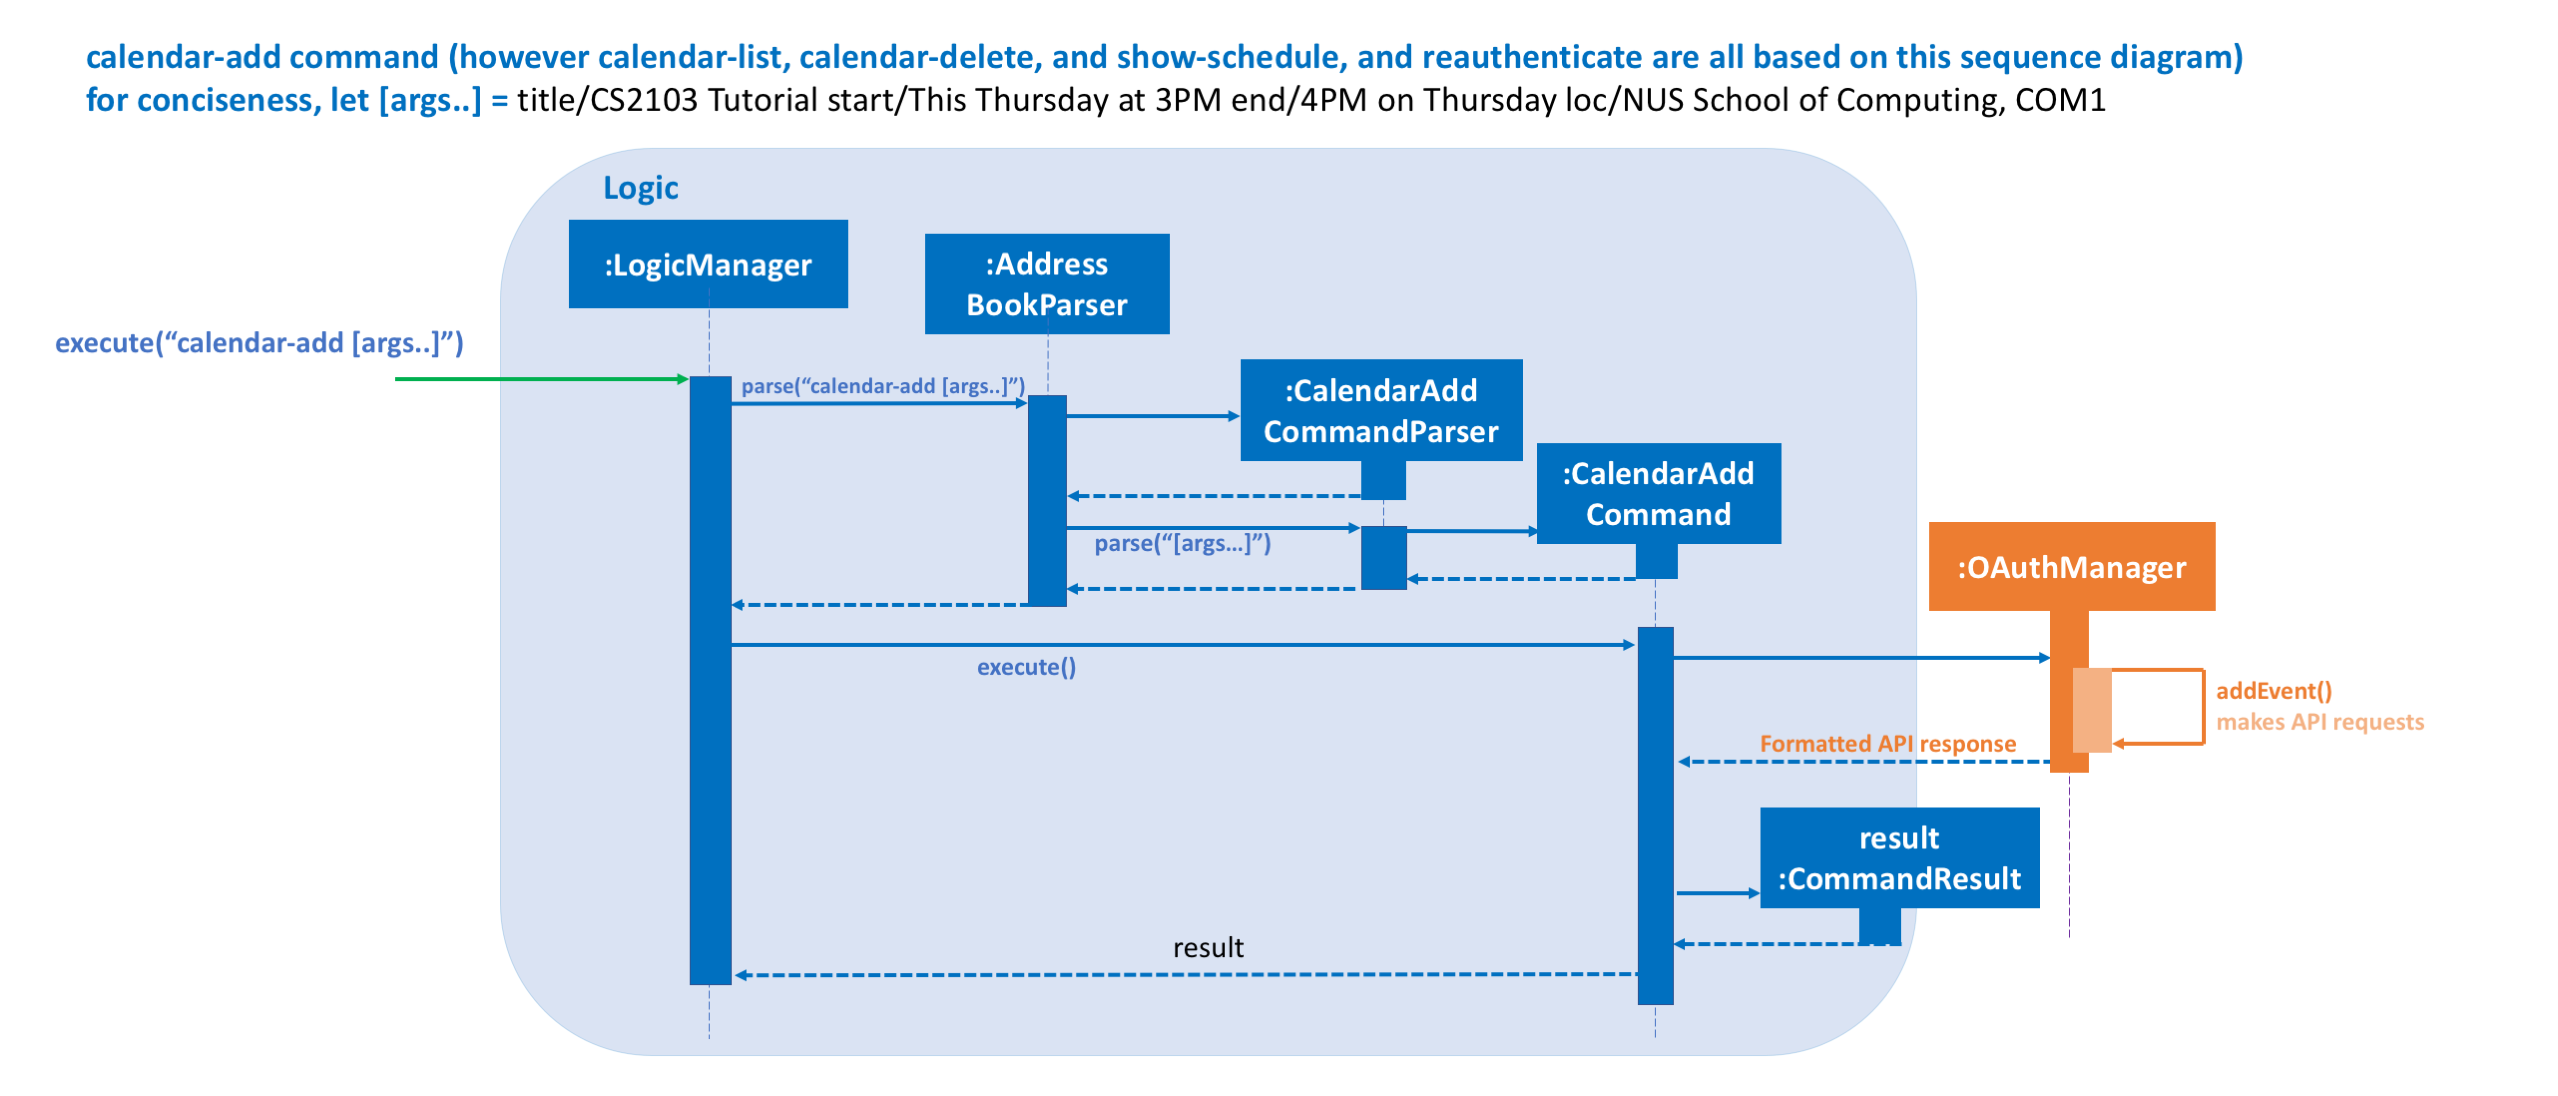
UML Sequence Diagram of Proposed Command Flow For calendar-add Command
Every command that requires OAuth (i.e. calendar-add, calendar-delete, calendar-list, show-schedule, and reauthenticate) will follow a similar flow with the potential commision of the parse step depending on the command.
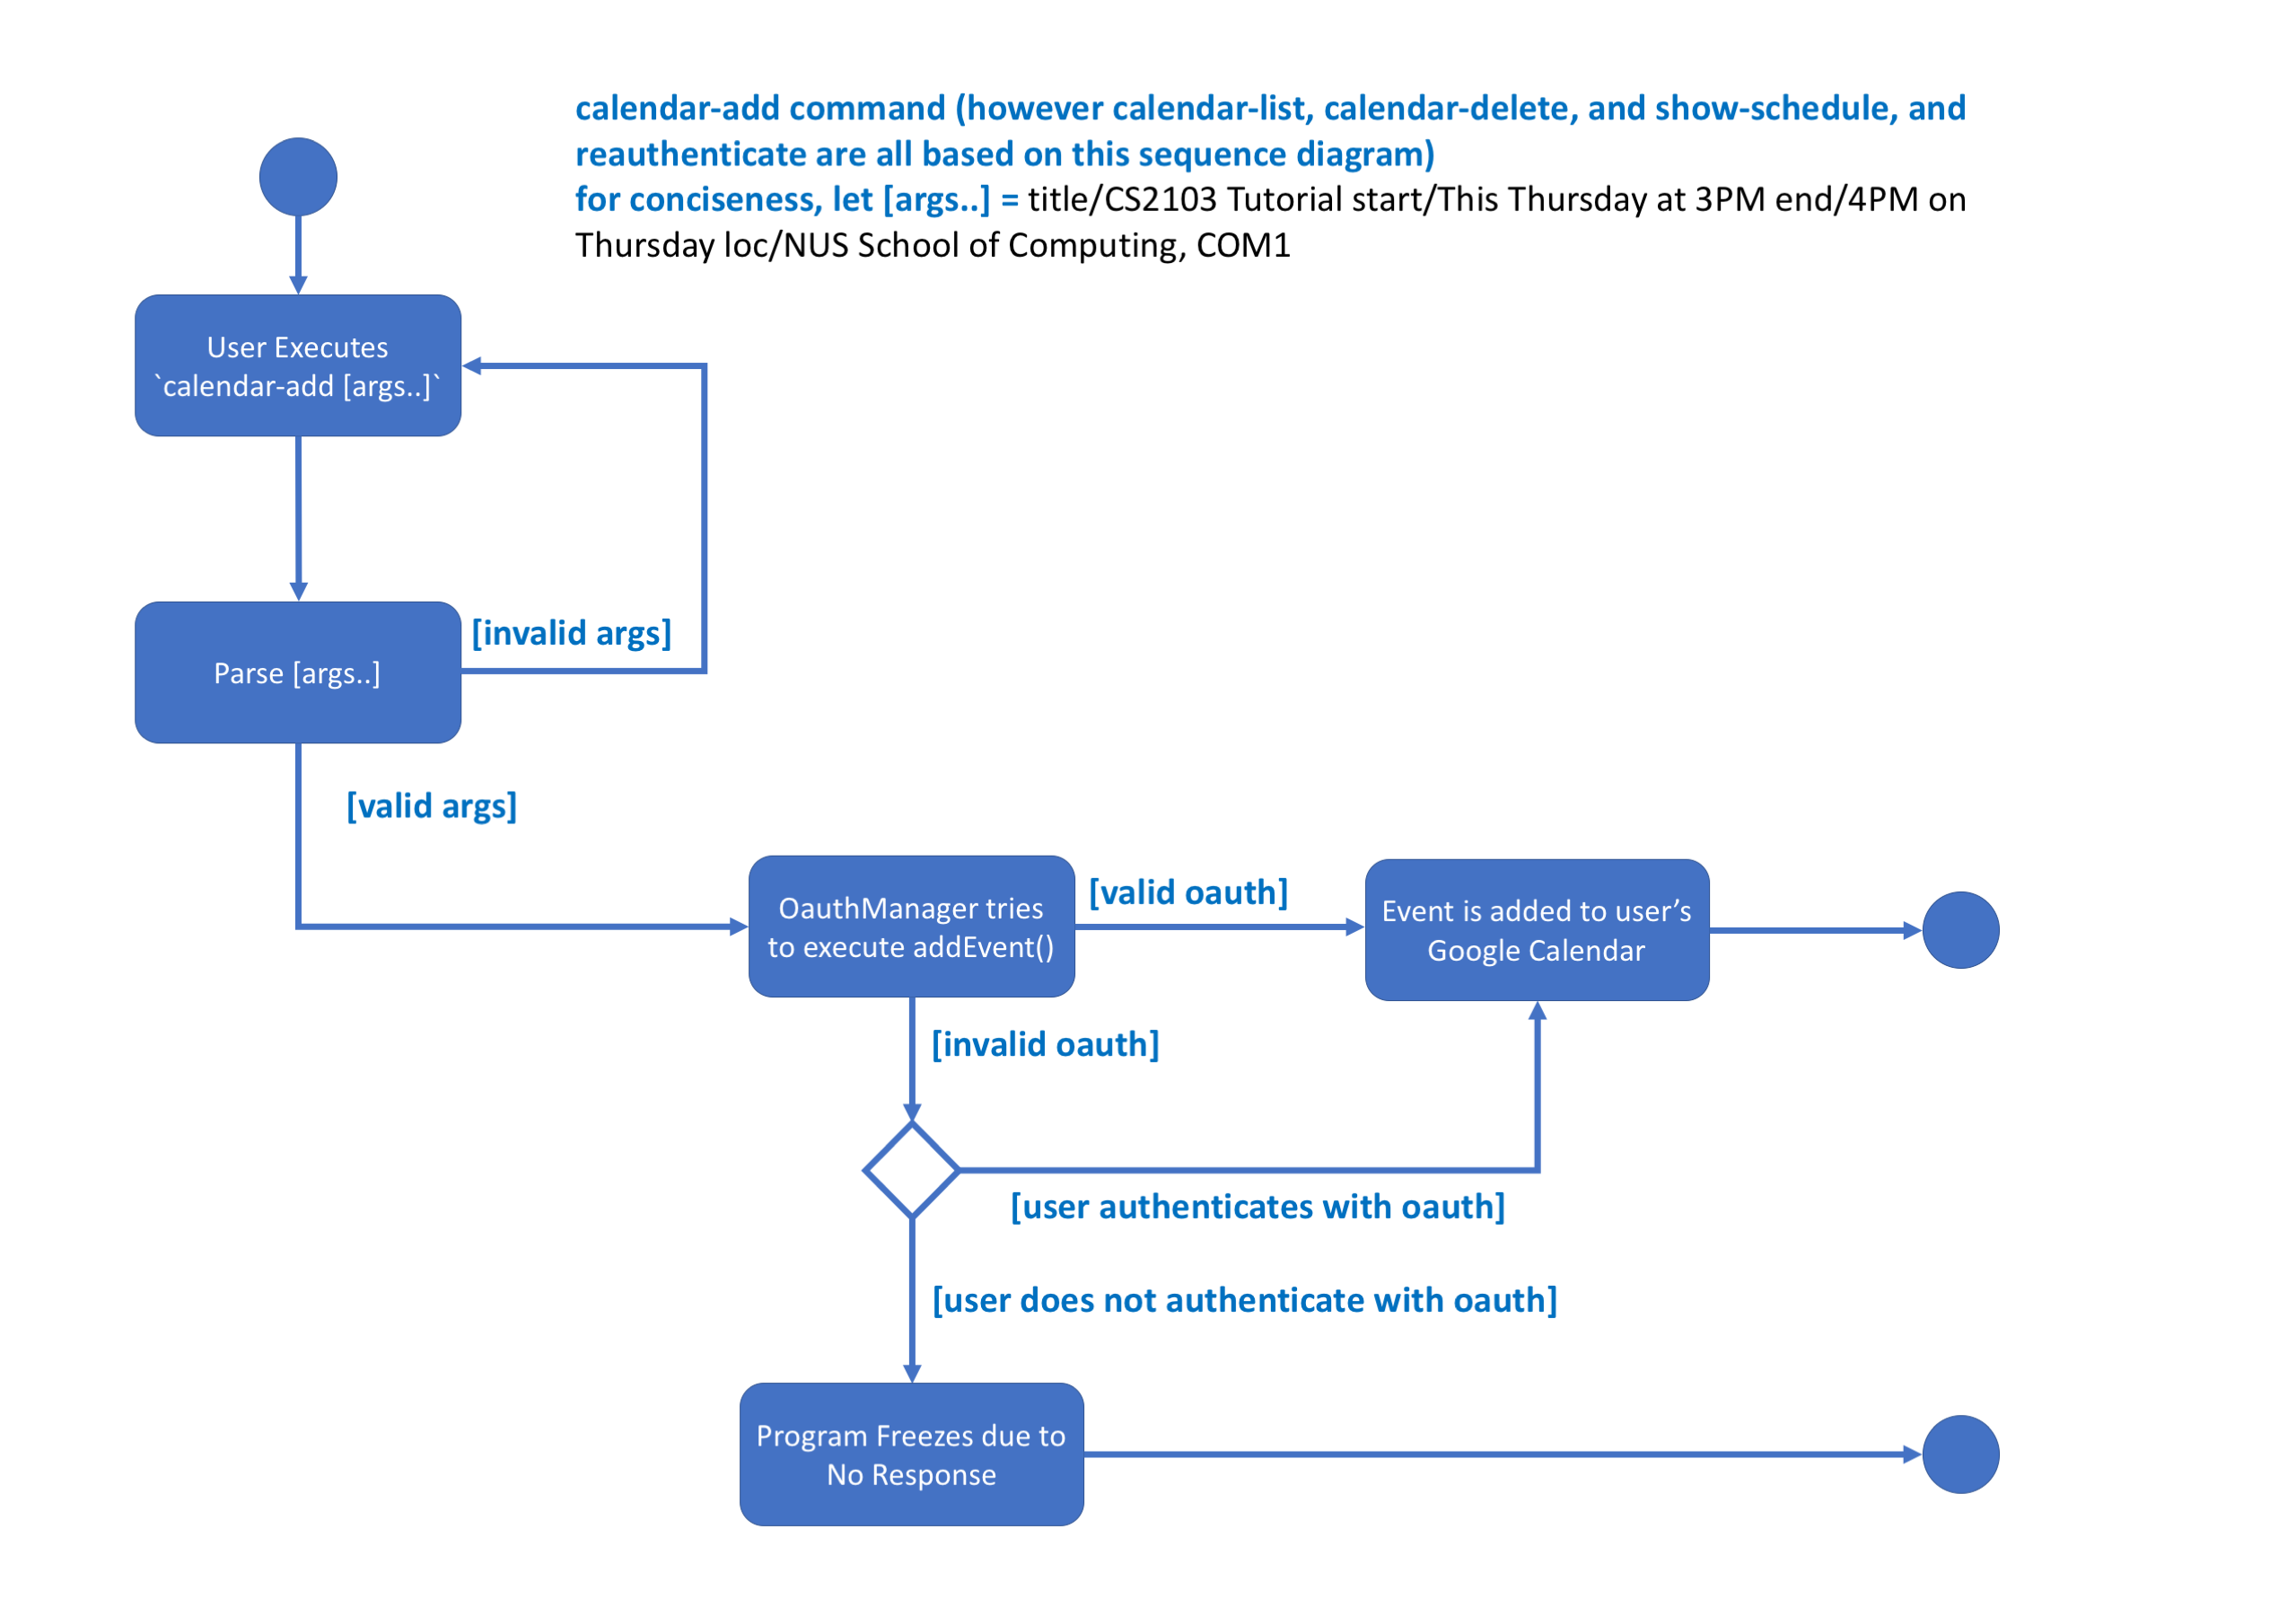
UML Activity Diagram of High Level Logic Flow For calendar-add Command
Every command that requires OAuth (i.e. calendar-add, calendar-delete, calendar-list, show-schedule, and reauthenticate) will follow a similar flow with the potential commision of the parse step depending on the command.
3.5.2. Design Considerations
Aspect: GUI
-
Alternative 1 (current choice): Native Google Calendar WebView
-
Pros: Minimal effort to implement as it is just a wrapper about the existing Google Calendar UI. Data is managed and secured by Google.
-
Cons: Cannot customize the interface without injecting customize styles. Requires complicated OAuth 2.0 authentication to work. Assumes that the user already has a Google account.
-
-
Alternative 2: CalendarFX
-
Pros: Can more easily create a custom UI and not rely on Google Calendar.
-
Cons: Documentation does not explain how to interface with the UI / Storage. Optimal if used with Google Calendar anyway. In the absense of using Google Calendar, it would require a custom local storage layer for persistant data.
-
-
Alternative 3: JFXtras
-
Pros: Simple adgenda view with relatively simple API to understand.
-
Cons: Not as feature rich as the other options and would require a custom local storage layer to have persistant data.
-
-
Alternative 4: Pure CLI Interface
-
Pros: Simple adgenda view with relatively simple API to understand.
-
Cons: Not as feature rich as the other options and would require a custom local storage layer to have persistant data.
-
Aspect: Data Access
-
Alternative 1 (current choice): Use OAuth
-
Pros: Can take advantage of Google’s first-party Calendar APIs for seamless CLI data manipulation.
-
Cons: Extremely complicated to configure and set up in a testable way.
-
-
Alternative 2: Require the user to export their existing Google Calendar and import it into the application. New events added to the SLAP calendar would not appear in their Google Calendar.
-
Pros: Does not require complex authentication and is thus easier to implement. Solution works offline.
-
Cons: Requires additional local storage implementations and calendar events are no longer synced to the cloud.
-
Cons: Less secure due to the requirement of local storage; more prone to file loss.
-
Aspect: Implementation of AddEventCommand → calendar-add [args..]
-
Alternative 1 (current choice): Use Google’s Calendar API
-
Pros: First-party direct access to Google Calendar data.
-
Cons: Requires the user to authenticate our application before this feature works correctly.
-
Cons: Requires a complex parser to make the input format more friendly for a wider range of users.
-
-
Alternative 2: Use URL Params
-
Pros: Does not require Oauth and is therefore easier to implement.
-
Cons: Requires the user to confirm the event addition through a GUI action, thus not allowing for a true CLI-only experience.
-
Aspect: Implementation of ViewCalendarCommand → calendar-launch and switch calendar
-
Alternative 1 (current choice): Open a Webview (either as a new window or within the main application gui)
-
Pros: Low development cost as the webview exists already.
-
Pros: Visually clear to the user how their calendar (and events) is organized.
-
Cons: Requires an internet connection. Has no CLI-friendly output.
-
-
Alternative 2: List events in the CLI (see next consideration)
-
Pros: CLI-only friendly. Does not require a webview and thus makes the application less resource intensive.
-
Cons: Higher development cost as it becomes necessary to format the response from Google’s APIs (and write a new set of logic to parse and format the data.)
-
Aspect: Implementation of ViewCalendarEventsCommand → calendar-list
-
Alternative 1 (current choice): CLI Output
-
Pros: Provides a command-line friendly way to view upcoming calendar events.
-
Cons: Much higher development cost as it was necessary to parse and format the response from Google’s APIs.
-
Cons: Requires OAuth.
-
Cons: Less visually clear to the user how their events are spaced out temporally.
-
-
Alternative 2: Create a new calendar interface similar to the Contacts Pane
-
Pros: Pros: Visually easy to parse and thematically in line with the overall design language of the application.
-
Cons: Requires a significant implementation change to adapt the UI due to the non-locally stored nature of the data from Google.
-
Aspect: Implementation of ViewCalendarEventsForParticularDayCommand → show-schedule [args..]
-
Alternative 1 (current choice): CLI Output
-
Pros: Can adapt
calendar-listcommand but increase specificity. -
Pros: Can pass this data to the daily scheduler feature to minimize duplicate code generation.
-
Cons: Less visually clear to the user how their events are spaced out temporally.
-
Cons: Requires OAuth.
-
-
Alternative 2: Create a new calendar interface similar to the Contacts Pane
-
Pros: Visually easy to parse and thematically in line with the overall design language of the application.
-
Pros: Can reuse the
calendar-listalternative 2 code if that route is decided upon. -
Cons: Requires a significant implementation change to adapt the UI due to the non-locally stored nature of the data from Google.
-
Aspect: Implementation of EditEventCommand → calendar-edit [Coming in v2.0]
-
Alternative 1 (current choice): Use Google’s Calendar API
-
Pros: First-party direct access to Google Calendar data.
-
Cons: Requires the user to authenticate our application before this feature works correctly.
-
-
Alternative 2: Only allow for graphical editing
-
Pros: No implementation required as everything happens through the spawned webview.
-
Cons: No CLI-friendly output. More resource intensive on the end-user’s system.
-
Aspect: Implementation of DeleteEventCommand → calendar-delete [args..]
-
Alternative 1 (current choice): Use Google’s Calendar API
-
Pros: First-party direct access to Google Calendar data.
-
Pros: Scales well with multiple users (sandboxed credential authorization).
-
Cons: Requires the user to authenticate our application before this feature works correctly.
-
-
Alternative 2: Only allow for graphical deleting
-
Pros: No implementation required as everything happens through the spawned WebView.
-
Cons: No CLI-friendly output. More resource intensive on the end-user’s system.
-
Cons: Does not scale well with multiple users.
-
3.6. Map Components
3.6.1. Current Implementation
The map view feature is implemented using GMapsFX, an imported library created by rterp. The library contains basic integration of Google Maps APIs into FMXL files.
The feature supports the display and retrieval of addresses as a marker and of directions on the various Google Map components implemented across the application. There are two main instances of Map: in Details Feature and Daily Scheduler Feature.
Each map is loaded a separately as independent MapPanels with their own MapManager, located in logic folder managing them. Switching out of feature will unload the respective MapPanel, required due to limitations of API used.
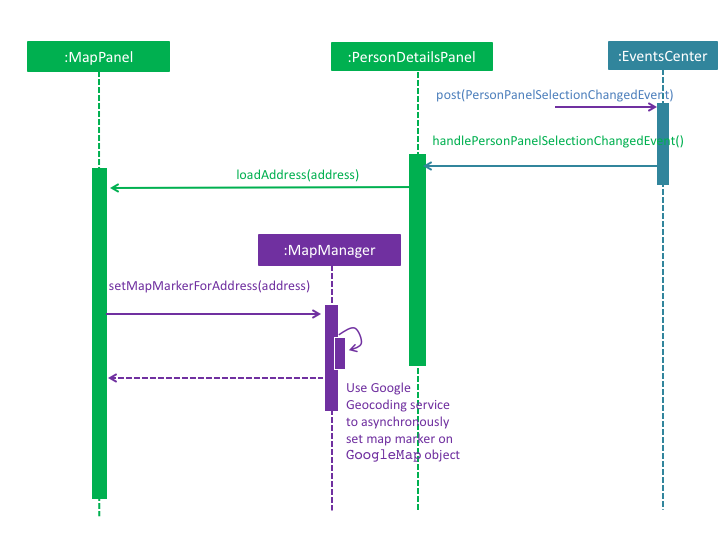
The above sequence diagram represents the process of loading and setting a new marker on the map panel within Person Details panel. The feature can create markers to pin beneficiary location on map and also display suggested navigation routes between event locations.
As the Map Panel is a UI component, adopting the event-driven approach, we have made it such that the parent of the Map Panel
listens for the PersonPanelSelectionChangeEvent to signal the child Map Panel to load a load/set a new address on the map.
The Google geocoding service helps to translate the string address into a proper Geocode request for Google to process.
3.6.2. Design Considerations
Aspect: GUI
-
Alternative 1 (current choice):
GMapsFX-
Pros: Intuitive to use. Collated various Google Map APIs to be compatible with JavaFX. Sufficient for displaying and controlling simple usage of Google Maps. Once loaded, the map does not require further initialisation calls to load different address.
-
Cons: Documentation is at times unclear. Several methods are designed as lambda expressions but not specified in documentation. Limited flexibility. Can only load one map at a time.
-
-
Alternative 2: Use WebView component and load HTML file containing simple embedded Google Maps
-
Pros: Easy to implement.
-
Cons: Requires re-loading for each call to view different person. Lacking in control. Application cannot communicate efficiently to loaded pages. Easy to break. Inflexible.
-
-
Alternative 3: Integrate Google Maps APIs directly
-
Pros: Well-documented. Full-access to Google Maps APIs allows for great flexibility.
-
Cons: Too complicated. Not built/compatible for JavaFX. Cannot load more than one map at a time.
-
Aspect: Logic
-
Alternative 1 (current choice): Maintain a non-static
MapManagerinlogicto handle manipulation of Map.-
Pros: Cleaner code. Each
MapPanelmaintains their own logic controller. Avoids asynchronous event/callback errors. -
Cons: May have issues with retrieving correct data. Have to instantiate new
MapManagerfor every instance of Map.
-
-
Alternative 2: Use a static Map logic manager that is called only when required.
-
Pros: Not all map instances require a dedicated MapManager to handle requests.
-
Cons: GMapsFX has limitations in using static class, attributes has to be reset for each Map.
-
3.7. Daily Scheduler
3.7.1. Current Implementation
Feature includes a list of scheduled events for the specified day in addition to the aforementioned maps implemented using GMapsFX, an imported library created by rterp.
Daily Scheduler feature involves two separate sections,Events List Display and Navigation. The display portion focuses on retrieving events of the specified date whereas the navigation portion seeks to retrieve suggested routes between those events.
The Daily Scheduler feature will involve the UI component as while as the Model component, and makes use of OAuthManager to get required events.
The OAuthManager is only used in the parser of the navigate command to retrieve the relevant event pairs.
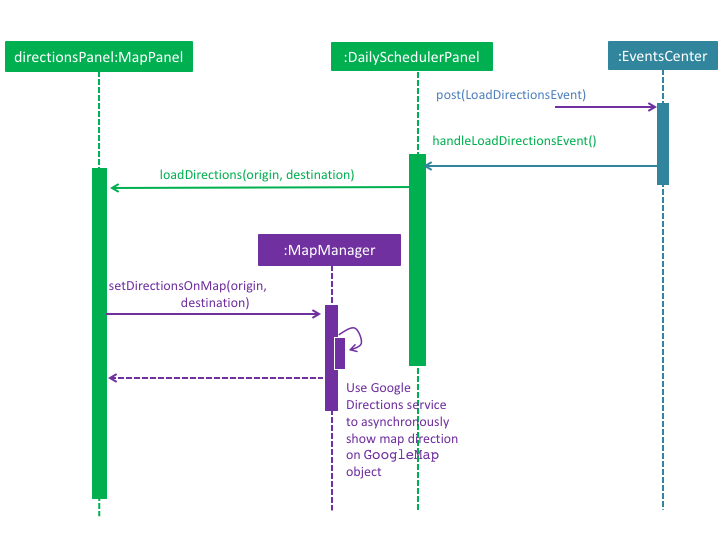
The above sequence diagram represents the process of loading and setting new direction markers on the map panel within Daily Scheduler panel.
This happens after the parsing and doing the execution of navigate command where LoadDirectionsEvent is posted as an event.
The DailySchedulerPanel, being the parent of the directionPanel, listens for the event and will update the map panel accordingly.
3.8. Logging
We are using java.util.logging package for logging. The LogsCenter class is used to manage the logging levels and logging destinations.
-
The logging level can be controlled using the
logLevelsetting in the configuration file (See Section 3.9, “Configuration”) -
The
Loggerfor a class can be obtained usingLogsCenter.getLogger(Class)which will log messages according to the specified logging level -
Currently log messages are output through:
Consoleand to a.logfile.
Logging Levels
-
SEVERE: Critical problem detected which may possibly cause the termination of the application -
WARNING: Can continue, but with caution -
INFO: Information showing the noteworthy actions by the App -
FINE: Details that is not usually noteworthy but may be useful in debugging e.g. print the actual list instead of just its size
3.9. Configuration
Certain properties of the application can be controlled (e.g App name, logging level) through the configuration file (default: config.json).
4. Documentation
We use asciidoc for writing documentation.
| We chose asciidoc over Markdown because asciidoc, although a bit more complex than Markdown, provides more flexibility in formatting. |
4.1. Editing Documentation
See UsingGradle.adoc to learn how to render .adoc files locally to preview the end result of your edits.
Alternatively, you can download the AsciiDoc plugin for IntelliJ, which allows you to preview the changes you have made to your .adoc files in real-time.
4.2. Publishing Documentation
See UsingTravis.adoc to learn how to deploy GitHub Pages using Travis.
4.3. Converting Documentation to PDF format
We use Google Chrome for converting documentation to PDF format, as Chrome’s PDF engine preserves hyperlinks used in webpages.
Here are the steps to convert the project documentation files to PDF format.
-
Follow the instructions in UsingGradle.adoc to convert the AsciiDoc files in the
docs/directory to HTML format. -
Go to your generated HTML files in the
build/docsfolder, right click on them and selectOpen with→Google Chrome. -
Within Chrome, click on the
Printoption in Chrome’s menu. -
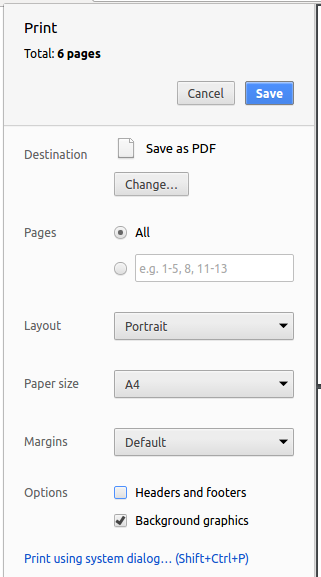
Set the destination to
Save as PDF, then clickSaveto save a copy of the file in PDF format. For best results, use the settings indicated in the screenshot below.
5. Testing
5.1. Running Tests
There are three ways to run tests.
| The most reliable way to run tests is the 3rd one. The first two methods might fail some GUI tests due to platform/resolution-specific idiosyncrasies. |
Method 1: Using IntelliJ JUnit test runner
-
To run all tests, right-click on the
src/test/javafolder and chooseRun 'All Tests' -
To run a subset of tests, you can right-click on a test package, test class, or a test and choose
Run 'ABC'
Method 2: Using Gradle
-
Open a console and run the command
gradlew clean allTests(Mac/Linux:./gradlew clean allTests)
| See UsingGradle.adoc for more info on how to run tests using Gradle. |
Method 3: Using Gradle (headless)
Thanks to the TestFX library we use, our GUI tests can be run in the headless mode. In the headless mode, GUI tests do not show up on the screen. That means the developer can do other things on the Computer while the tests are running.
To run tests in headless mode, open a console and run the command gradlew clean headless allTests (Mac/Linux: ./gradlew clean headless allTests)
5.2. Types of tests
We have two types of tests:
-
GUI Tests - These are tests involving the GUI. They include,
-
System Tests that test the entire App by simulating user actions on the GUI. These are in the
systemtestspackage. -
Unit tests that test the individual components. These are in
seedu.address.uipackage.
-
-
Non-GUI Tests - These are tests not involving the GUI. They include,
-
Unit tests targeting the lowest level methods/classes.
e.g.seedu.address.commons.StringUtilTest -
Integration tests that are checking the integration of multiple code units (those code units are assumed to be working).
e.g.seedu.address.storage.StorageManagerTest -
Hybrids of unit and integration tests. These test are checking multiple code units as well as how the are connected together.
e.g.seedu.address.logic.LogicManagerTest
-
5.3. Troubleshooting Testing
Problem: HelpWindowTest fails with a NullPointerException.
-
Reason: One of its dependencies,
UserGuide.htmlinsrc/main/resources/docsis missing. -
Solution: Execute Gradle task
processResources.
6. Dev Ops
6.1. Build Automation
See UsingGradle.adoc to learn how to use Gradle for build automation.
6.2. Continuous Integration
We use Travis CI and AppVeyor to perform Continuous Integration on our projects. See UsingTravis.adoc and UsingAppVeyor.adoc for more details.
6.3. Coverage Reporting
We use Coveralls to track the code coverage of our projects. See UsingCoveralls.adoc for more details.
6.4. Documentation Previews
When a pull request has changes to asciidoc files, you can use Netlify to see a preview of how the HTML version of those asciidoc files will look like when the pull request is merged. See UsingNetlify.adoc for more details.
6.5. Making a Release
Here are the steps to create a new release.
-
Update the version number in
MainApp.java. -
Generate a JAR file using Gradle.
-
Tag the repo with the version number. e.g.
v0.1 -
Create a new release using GitHub and upload the JAR file you created.
6.6. Managing Dependencies
A project often depends on third-party libraries. For example, Address Book depends on the Jackson library for XML parsing. Managing these dependencies can be automated using Gradle. For example, Gradle can download the dependencies automatically, which is better than these alternatives.
a. Include those libraries in the repo (this bloats the repo size)
b. Require developers to download those libraries manually (this creates extra work for developers)
Appendix A: Suggested Programming Tasks to Get Started
Suggested path for new programmers:
-
First, add small local-impact (i.e. the impact of the change does not go beyond the component) enhancements to one component at a time. Some suggestions are given in Section A.1, “Improving each component”.
-
Next, add a feature that touches multiple components to learn how to implement an end-to-end feature across all components. Section A.2, “Creating a new command:
remark” explains how to go about adding such a feature.
A.1. Improving each component
Each individual exercise in this section is component-based (i.e. you would not need to modify the other components to get it to work).
Logic component
Scenario: You are in charge of logic. During dog-fooding, your team realize that it is troublesome for the user to type the whole command in order to execute a command. Your team devise some strategies to help cut down the amount of typing necessary, and one of the suggestions was to implement aliases for the command words. Your job is to implement such aliases.
Do take a look at Section 2.3, “Logic component” before attempting to modify the Logic component.
|
-
Add a shorthand equivalent alias for each of the individual commands. For example, besides typing
clear, the user can also typecto remove all persons in the list.
Model component
Scenario: You are in charge of model. One day, the logic-in-charge approaches you for help. He wants to implement a command such that the user is able to remove a particular tag from everyone in the address book, but the model API does not support such a functionality at the moment. Your job is to implement an API method, so that your teammate can use your API to implement his command.
Do take a look at Section 2.4, “Model component” before attempting to modify the Model component.
|
-
Add a
removeTag(Tag)method. The specified tag will be removed from everyone in the address book.
Ui component
Scenario: You are in charge of ui. During a beta testing session, your team is observing how the users use your address book application. You realize that one of the users occasionally tries to delete non-existent tags from a contact, because the tags all look the same visually, and the user got confused. Another user made a typing mistake in his command, but did not realize he had done so because the error message wasn’t prominent enough. A third user keeps scrolling down the list, because he keeps forgetting the index of the last person in the list. Your job is to implement improvements to the UI to solve all these problems.
Do take a look at Section 2.2, “UI component” before attempting to modify the UI component.
|
-
Use different colors for different tags inside person cards. For example,
friendstags can be all in brown, andcolleaguestags can be all in yellow.Before
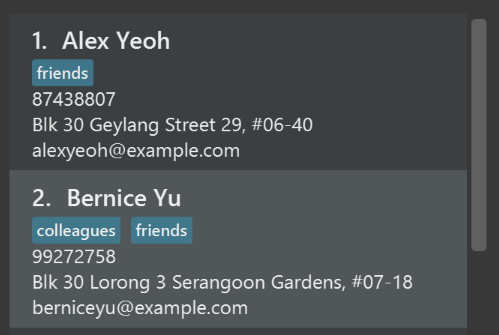
After
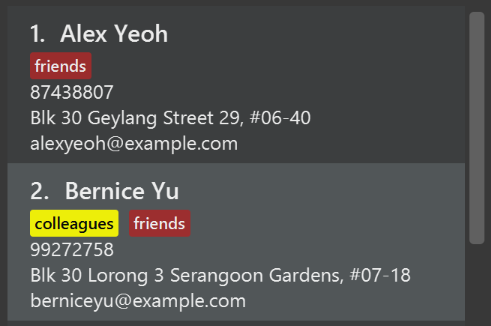
-
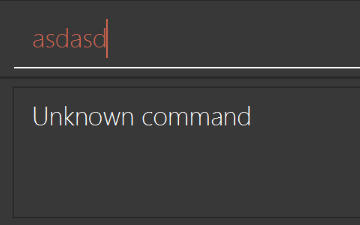
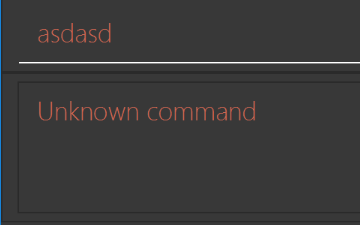
Modify
NewResultAvailableEventsuch thatResultDisplaycan show a different style on error (currently it shows the same regardless of errors).Before
After
-
Modify the
StatusBarFooterto show the total number of people in the address book.Before

After

Storage component
Scenario: You are in charge of storage. For your next project milestone, your team plans to implement a new feature of saving the address book to the cloud. However, the current implementation of the application constantly saves the address book after the execution of each command, which is not ideal if the user is working on limited internet connection. Your team decided that the application should instead save the changes to a temporary local backup file first, and only upload to the cloud after the user closes the application. Your job is to implement a backup API for the address book storage.
Do take a look at Section 2.5, “Storage component” before attempting to modify the Storage component.
|
-
Add a new method
backupAddressBook(ReadOnlyAddressBook), so that the address book can be saved in a fixed temporary location.
A.2. Creating a new command: remark
By creating this command, you will get a chance to learn how to implement a feature end-to-end, touching all major components of the app.
Scenario: You are a software maintainer for addressbook, as the former developer team has moved on to new projects. The current users of your application have a list of new feature requests that they hope the software will eventually have. The most popular request is to allow adding additional comments/notes about a particular contact, by providing a flexible remark field for each contact, rather than relying on tags alone. After designing the specification for the remark command, you are convinced that this feature is worth implementing. Your job is to implement the remark command.
A.2.1. Description
Edits the remark for a person specified in the INDEX.
Format: remark INDEX r/[REMARK]
Examples:
-
remark 1 r/Likes to drink coffee.
Edits the remark for the first person toLikes to drink coffee. -
remark 1 r/
Removes the remark for the first person.
A.2.2. Step-by-step Instructions
[Step 1] Logic: Teach the app to accept 'remark' which does nothing
Let’s start by teaching the application how to parse a remark command. We will add the logic of remark later.
Main:
-
Add a
RemarkCommandthat extendsUndoableCommand. Upon execution, it should just throw anException. -
Modify
AddressBookParserto accept aRemarkCommand.
Tests:
-
Add
RemarkCommandTestthat tests thatexecuteUndoableCommand()throws an Exception. -
Add new test method to
AddressBookParserTest, which tests that typing "remark" returns an instance ofRemarkCommand.
[Step 2] Logic: Teach the app to accept 'remark' arguments
Let’s teach the application to parse arguments that our remark command will accept. E.g. 1 r/Likes to drink coffee.
Main:
-
Modify
RemarkCommandto take in anIndexandStringand print those two parameters as the error message. -
Add
RemarkCommandParserthat knows how to parse two arguments, one index and one with prefix 'r/'. -
Modify
AddressBookParserto use the newly implementedRemarkCommandParser.
Tests:
-
Modify
RemarkCommandTestto test theRemarkCommand#equals()method. -
Add
RemarkCommandParserTestthat tests different boundary values forRemarkCommandParser. -
Modify
AddressBookParserTestto test that the correct command is generated according to the user input.
[Step 3] Ui: Add a placeholder for remark in PersonCard
Let’s add a placeholder on all our PersonCard s to display a remark for each person later.
Main:
-
Add a
Labelwith any random text insidePersonListCard.fxml. -
Add FXML annotation in
PersonCardto tie the variable to the actual label.
Tests:
-
Modify
PersonCardHandleso that future tests can read the contents of the remark label.
[Step 4] Model: Add Remark class
We have to properly encapsulate the remark in our Person class. Instead of just using a String, let’s follow the conventional class structure that the codebase already uses by adding a Remark class.
Main:
-
Add
Remarkto model component (you can copy fromAddress, remove the regex and change the names accordingly). -
Modify
RemarkCommandto now take in aRemarkinstead of aString.
Tests:
-
Add test for
Remark, to test theRemark#equals()method.
[Step 5] Model: Modify Person to support a Remark field
Now we have the Remark class, we need to actually use it inside Person.
Main:
-
Add
getRemark()inPerson. -
You may assume that the user will not be able to use the
addandeditcommands to modify the remarks field (i.e. the person will be created without a remark). -
Modify
SampleDataUtilto add remarks for the sample data (delete youraddressBook.xmlso that the application will load the sample data when you launch it.)
[Step 6] Storage: Add Remark field to XmlAdaptedPerson class
We now have Remark s for Person s, but they will be gone when we exit the application. Let’s modify XmlAdaptedPerson to include a Remark field so that it will be saved.
Main:
-
Add a new Xml field for
Remark.
Tests:
-
Fix
invalidAndValidPersonAddressBook.xml,typicalPersonsAddressBook.xml,validAddressBook.xmletc., such that the XML tests will not fail due to a missing<remark>element.
[Step 6b] Test: Add withRemark() for PersonBuilder
Since Person can now have a Remark, we should add a helper method to PersonBuilder, so that users are able to create remarks when building a Person.
Tests:
-
Add a new method
withRemark()forPersonBuilder. This method will create a newRemarkfor the person that it is currently building. -
Try and use the method on any sample
PersoninTypicalPersons.
[Step 7] Ui: Connect Remark field to PersonCard
Our remark label in PersonCard is still a placeholder. Let’s bring it to life by binding it with the actual remark field.
Main:
-
Modify
PersonCard's constructor to bind theRemarkfield to thePerson's remark.
Tests:
-
Modify
GuiTestAssert#assertCardDisplaysPerson(…)so that it will compare the now-functioning remark label.
[Step 8] Logic: Implement RemarkCommand#execute() logic
We now have everything set up… but we still can’t modify the remarks. Let’s finish it up by adding in actual logic for our remark command.
Main:
-
Replace the logic in
RemarkCommand#execute()(that currently just throws anException), with the actual logic to modify the remarks of a person.
Tests:
-
Update
RemarkCommandTestto test that theexecute()logic works.
A.2.3. Full Solution
See this PR for the step-by-step solution.
Appendix B: Product Scope
Target user profile:
Our SLAP aims to target social workers who have to visit different less privileged families and/or high-risk stay-at-home patients as their daily routine. Social workers regularly make visits to these beneficiaries to assist them in overcoming obstacles in their lives.
Our SLAP will allow them to organise their schedule for the day as they may have to visit multiple locations, take copious notes and help in many different ways. For example, a social worker may have to pick a victim of domestic abuse up in the morning to take her to the lawyer’s office to file for a divorce from her abusive husband and after taking her home, the social worker might have to visit another family to check on a disabled patient.
-
has a need to manage a significant number of contacts
-
handles sensitive contacts
-
plans and manages their daily visits on desktop
-
is reasonably comfortable using CLI apps
Value proposition:
-
manage contacts faster than a typical mouse/GUI driven app
-
easily add and manage calendar events without a full-blown application experience
-
organize key meetings and keep track of key contacts in one place
-
able to provide routes from one location to another
-
uses minimal system resources
-
more secure than a traditional address book
Feature contribution:
Jason Jerome Manson-Hing
Major Feature: Calendar Integration
* Functional calendar within the application with add/view/delete functionality.
* This is useful for social workers to keep track of all of the things that they have to do now and in the future.
This calendar will be seperate from their personal calendar so as to keep business and personal information seperate.
Additionally, this calendar will integrate with the daily scheduler function to help optimize their time in a day.
Minor Feature: Daily Scheduler (Events)
* Allows the user to view their events for a particular day.
* Supplies the data for the daily scheduler routing (navigation)
Minor Feature: View Error Log in App
* Allows the user to view the application’s error from within the application itself.
* This is useful as it allows an advanced user to send the application developer a log of the events that occurred before an exception was encountered.
* This feature is unobtrustive as the information contained within the log is essentially meaningless to everyone except for the developer. Additionally, the command is relatively hard to invoke accidentally, and thus has a low chance of being discovered. Additionally, this command only shows read-only information and thus cannot cause any harm to the system.
* This feature is useful so that if the user encounters an issue and wishes to help provide more information, they can relatively easily retrieve this information without much effort provided they are instructed on how to do so. It is unlikely that a user will encounter this feature by accident.
Chan Jin Jia
Major Feature: Map Location and Daily Scheduler
-
As our application aims to better the day-to-day operations of a social worker, integrating maps into our application greatly aids their visitation process. This integration aims to make the locating of beneficiaries much more convenient.
-
A vital feature to any social worker will be that of a daily scheduler that lists their scheduled events for the day. Not only does the daily scheduler collates the user’s list of calendar events for the day into an easily consumable view, the daily scheduler feature of our app will also display the suggested route between event locations or beneficiary addresses to facilitate ease of movement.
-
Allows the social worker to plan the most optimal route of travel for their beneficiary visits for the day and creates the optimal schedule for them.
Minor Feature: Main GUI and CSS
-
In addition, a cleaner Main UI will be required to better display our Session Logger and Planner (SLAP) for Social Worker application as it will contain several major features (beneficiary details, calendar, and daily scheduler).
-
On the details feature, map is loaded to display address of beneficiary and a panel of previous session logs are loaded to remind social worker of previous sessions with the beneficiary.
-
The scheduler feature contains indicators on the right of the map to provide visual cues of the number of journeys required for the day.
Kaiser Tan
Major feature: User Login and Multi-User capabilities
-
The application will support multiple users and each having their own addressbook. This is a step towards allowing our application to be used as a centralised application used by institute of social workers.
-
User can also login and logout safely, preventing external users from accessing the SLAP without authorisation
-
As a social worker, he/she should be able to secure SLAP and only ensure that it is only accessible to him/her, hence a login function is needed to maintain the C-I-A security framework.
Minor feature: Adding Session Reports/Logs
-
This feature allows the social worker to add logs to the SLAP.
-
The session reports/logs feature is a crucial feature for our target audience of social workers.
-
A social worker should be able to add their reports for their patient for each session, so that he/she have a consolidated view of all their reports specific to the patient. This allows for convenience and easy tracking on the progress of their patients.
Appendix C: User Stories
Priorities: High (must have) - * * *, Medium (nice to have) - * *, Low (unlikely to have) - *
| Priority | As a … | I want to … | So that I can… |
|---|---|---|---|
|
new user |
see usage instructions |
refer to instructions when I forget how to use the App |
|
user |
add a new person |
|
|
user |
delete a person |
remove entries that I no longer need |
|
user |
find a person by name |
locate details of persons without having to go through the entire list |
|
user |
hide private contact details by default |
minimize chance of someone else seeing them by accident |
|
social worker |
add calendar events |
keep track of my interactions with my contacts |
|
social worker |
view upcoming calendar events |
quickly check my schedule |
|
social worker |
view calendar events on a particular day |
quickly check my daily schedule |
|
social worker |
delete calendar events |
keep my schedule up to date |
|
advanced user |
view error logs in app |
help the developer resolve the issues that I encountered |
|
novice user |
get a command correction suggestion |
easily fix my mistakes |
|
social worker |
have command autocomplete |
enter commands faster |
|
social worker with many persons in the address book |
sort persons by name |
locate a person easily |
|
social worker |
edit the details of an existing contact |
update a contact’s information to the most current information |
|
social worker with many persons in the address book |
filter contacts by tags |
quickly view a subset of my contacts list |
|
social worker |
sort contacts by tags |
view contacts listed in decreasing level of urgency (in terms of their case)/priority |
|
social worker sharing my computer with others |
automatically log out of my calendar session |
other users cannot view or edit my private details |
|
advanced user |
change the location of my address book |
more easily back it up |
|
user |
back up my address book |
restore it to a previous state in case of emergency |
|
user |
export one or several contacts |
easily share them with other address book users |
|
user |
add the address of my contacts |
keep track of where they live |
|
user |
view the address of my contacts on a map |
visually see where they live |
|
user |
edit/delete the address of my contacts |
keep contacts up to date |
|
advanced user |
export my entire address book as a CSV or JSON |
for use in other applications |
|
user |
favourite contacts |
keep track of particularly important contacts |
|
user |
view frequently interacted-with contacts |
quickly access frequently-contacted people |
|
user |
view recently interacted-with contacts |
quickly access recently interacted-with people |
|
user |
switch between views of features |
easily navigate the address book features |
|
social worker |
view a daily schedule of planned visits |
know where to visit and order of events for the day |
|
social worker |
view pre-planned route between visit addresses |
have a general direction between addresses planned for the day |
|
social worker |
export daily schedule as pdf file |
view the document outside of the programme and/or be able to print out a physical copy |
|
social worker |
view fully-detailed directions between addresses |
know what modes of transport to take and navigate the way between addresses |
|
social worker |
send reminder email from address book |
be efficient with reminding beneficies of scheduled visits |
|
social worker |
add new session reports |
be able to have a consolidated record of all my reports for easy reference. |
|
social worker |
edit my session reports |
be able to have a make edit mistakes in my reports |
`* * ` |
social worker |
delete my session reports |
remove reports that are irrelevant |
|
secure user |
login |
gain access to my address book |
|
social worker |
login into my account with any instance of application |
so that I can easily access my SLAP information anywhere |
|
secure user |
logout |
prevent others from having authorised access to my SLAP |
|
secure user |
change my password |
update and secure access to my address book whenever I want |
|
user |
reset my password |
still recover my password when I forget what it is |
|
secure user |
encrypt and export my address book |
so that I can securely transport my address from one computer to another |
|
secure user |
lock my address book |
so that it is convenient for me to secure and access my address book while it is still running |
Appendix D: Use Cases
(For all use cases below, the System is the AddressBook and the Actor is the user, unless specified otherwise)
Use case: Delete person
MSS
-
User requests to list persons
-
AddressBook shows a list of persons
-
User requests to delete a specific person in the list
-
AddressBook deletes the person
Use case ends.
Extensions
-
2a. The list is empty.
Use case ends.
-
3a. The given index is invalid.
-
3a1. AddressBook shows an error message.
Use case resumes at step 2.
-
Use case: Add Calendar Event
MSS
-
User attempts to add calendar event.
-
AddressBook updates calendar events and updates the main window to show the events.
Use case ends.
Extensions
-
1a. User formats the command incorrectly.
-
1a1. AddressBook notifies user of incorrect syntax.
Use case ends.
-
Use case: View Calendar Event
MSS
-
User requests to view calendar events.
-
AddressBook shows the user the relevant calendar events.
Use case ends.
Extensions
-
1a. There are no calendar events.
-
1a1. AddressBook notifies user that there are no events.
Use case ends.
-
Use case: Edit Calendar Event
MSS
-
User requests to view calendar events.
-
AddressBook shows the user a list of their relevant calendar events.
-
User selects calendar event to edit.
-
AddressBook returns calendar event info as editable string.
-
User edits information and confirms action.
-
AddressBook saves changes and refreshes the main window.
Extensions
-
1a. There are no calendar events.
-
1a1. AddressBook notifies user that there are no events.
Use case ends.
-
Use case: Delete Calendar Event
MSS
-
User requests to view calendar events.
-
AddressBook retrieves calendar events and updates the main window to show the events.
-
User selects calendar event to delete.
-
AddressBook asks for user confirmation.
-
User confirms action.
-
AddressBook deletes calendar event and refreshes the main window.
Extensions
-
1a. There are no calendar events.
-
1a1. AddressBook notifies user that there are no events.
Use case ends.
-
-
3a. User selects invalid index.
-
3a1. AddressBook notifies user that they have selected an incorrect index.
Use case resumes at step 2.
-
Use case: View Daily Schedule Events
MSS
-
User requests to view events scheduled for a particular day.
-
AddressBook shows the user the relevant calendar events.
Use case ends.
Extensions
-
1a. There are no calendar events.
-
1a1. AddressBook notifies user that there are no events.
Use case ends.
-
Use case: Show Error Log
MSS
-
User requests to see error log.
-
AddressBook retrieves error log and displays it to the user.
Extensions
-
1a. There is no error log.
-
1a1. AddressBook notifies user that there is no error log.
Use case ends.
-
Use case: Switch Views of Features
MSS
-
User requests to change view (between calendar, details, daily schedule)
-
AddressBook updates main window to show specified feature
Use case ends.
Use case: View Daily Schedule
MSS
-
User requests to view daily schedule for specified date.
-
AddressBook retrieves calendar events for the specified date.
-
AddressBook retrieves addresses of specified contacts to be visited on specified day.
-
AddressBook requests for Google navigation between specified addresses.
-
AddressBook updates main window to show the listed events with suggested navigation.
-
User receives automatically generated daily schedule.
Use case ends.
Extensions
-
1a. Specified date is invalid
-
1a1. AddressBook notifies user of invalid date
Use case ends.
-
-
2a. Specified date has no calendar events.
-
2a1. AddressBook notifies user that there are no events.
Use case ends.
-
Use case: User Login
MSS 1. User enters username and password 2. SLAP allows access to UI
Extensions
-
1a. SLAP detects invalid username
-
1a1. SLAP displays “invalid username” and request for username followed by Step 1
Use case resumes at step 1.
-
-
3a. SLAP detects invalid password
-
3a1. SLAP displays “invalid password” and request for username followed by Step 1
Use case resumes at step 1.
-
Use case: User Logout
MSS
1. User attempts to logout
2. SLAP prompts for confirmation to logout
3. User confirms
4. AddressBook logs the user out
Use case: Create User
MSS 1. User enters desired username and password to create user 2. SLAP creates a user with the input username and password
Extensions
-
1a. SLAP detects invalid characters used in username and/or password
-
1a1. SLAP displays “invalid username and/or password” and request for username and password followed by Step 1
Use case resumes at step 1.
-
-
1b. SLAP detects that the username is taken
-
1b1. SLAP displays “username has been taken” and request for a new username and password followed by Step 1
Use case resumes at step 1.
-
Use case: Delete User
MSS 1. User enters desired username and password to delete user 2. SLAP deletes the user with the input username and password
Extensions
-
1a. SLAP detects no such username exists
-
1a1. SLAP displays “invalid username and/or password” and request for username and password followed by Step 1
Use case resumes at step 1.
-
-
1b. SLAP detects username exists but incorrect password
-
1b1. SLAP displays “invalid username and/or password” and request for username and password followed by Step 1
Use case resumes at step 1.
-
Use case: Export AddressBook
MSS
1. User attempts to export AddressBook
2. AddressBook prompts for directory to export the file
3. User enters directory
4. Address prompts for confirmation
5. User confirms
6. AddressBook exports storage file into specified directory
Appendix E: Non Functional Requirements
-
Should work on any mainstream OS as long as it has Java
1.8.0_60or higher installed. -
Should be able to hold up to 1000 persons without a noticeable sluggishness in performance for typical usage.
-
A user with above average typing speed for regular English text (i.e. not code, not system admin commands) should be able to accomplish most of the tasks faster using commands than using the mouse.
-
Should come with automated unit tests and open source code.
-
Should preserve user data when the program is restarted or updated.
-
Should still retain basic functionality even when not connected to the internet.
-
Should support both 32-bit and 64-bit operating systems.
-
Should not be graphically intensive for maximum compatibility.
-
Should be backward compatible with previous versions of SLAP app.
-
Should have all features and commands documented.
-
Should be easily usable by an infrequent computer user.
-
Should gracefully handle incorrect user input and return friendly error messages to the user.
-
Should be easy to setup and install for an infrequent computer user.
-
Should not unnecessarily collect data about a user.
-
Should sanitize sensitive user data before logging.
-
Should not allow non-users to access storage file
-
Should not allow non-users to read storage file
-
Should not exit the program without encrypting the storage file
-
Should not hang
Appendix F: Glossary
- Mainstream OS
-
Windows, Linux, Unix, OS-X
- Private contact detail
-
A contact detail that is not meant to be shared with others
- Infrequent computer user
-
A user who does not use a computer regularly (only a couple times a week)
- Events
-
A pre-planned visit by the social worker to check on beneficiary
- Daily schedule
-
A list of events of a specified date with navigation details
Appendix G: Product Survey
Product Name
Author: …
Pros:
-
…
-
…
Cons:
-
…
-
…
Appendix H: Instructions for Manual Testing
Given below are instructions to test the app manually.
| These instructions only provide a starting point for testers to work on; testers are expected to do more exploratory testing. |
H.1. Launch and Shutdown
-
Initial launch
-
Download the jar file and copy into an empty folder
-
Double-click the jar file
Expected: Shows the GUI with a set of sample contacts. The window size may not be optimum.
-
-
Saving window preferences
-
Resize the window to an optimum size. Move the window to a different location. Close the window.
-
Re-launch the app by double-clicking the jar file.
Expected: The most recent window size and location is retained.
-
H.2. Authentication process
H.2.1. Login and Logout
-
Login as a specific user.
-
Prerequisites: An existing user (with username: "test" and password: "pass") created.
-
Test Case:
login u/test p/pass
Expected: Login successful and GUI displays UI panels. Login successful in status message. Login status bar changes to green and displays login details. -
Test Case:
login u/test p/password
Expected: Login unsuccessful. Error message shown in status message. Login status bar unchanged. -
Test Case:
login u/testsss p/pass
Expected: Login unsuccessful. Error message shown in status message. Login status bar unchanged.
-
-
Logout from an account.
-
Prerequisites: Application is logged in as a user.
-
Test Case:
logout
Expected: Logout is successful.
-
-
Login when user is already logged in.
-
Prerequisites: Application is logged in as a user "test".
-
Test Case:
login u/test p/pass
Expected: Login unsuccessful. Error message showing that user has already in is displayed. Login status bar unchanged.
-
-
Logout when user is already logged out.
-
Prerequisites: Application has not been logged into.
-
Test Case:
login u/test p/pass
Expected: Login unsuccessful. Error message showing that user has already in is displayed. Login status bar unchanged.
-
H.2.2. Command restrictions when not logged in
-
Executing available commands when logged out.
-
Prerequisites: Application has not been logged into.
-
Test Case:
help
Expected: Command is executed. Help guide window opens. -
Other available commands to try:
create-user,delete-user,change-user-password,login,exit
Expected: Command is executed as intented
-
-
Executing unavailable commands when logged out.
-
Prerequisites: Application has not been logged into.
-
Test Case:
list
Expected: Command is not executed. Error message shown. -
Other unavailable commands to try:
edit,add,switch,calendar-launch, …
Expected: Command is not executed and error message is shown.
-
H.2.3. Security concern with history feature
-
Unable to access history when logged out.
-
Prerequisites: Application has not been logged into.
-
Test Case:
help
Press "Up" arrow key
Expected: User is unable to view history.
-
-
History is cleared when logout.
-
Prerequisites: An existing user (with username: "test" and password: "pass") is created.
-
Test Case:
login u/test p/pass
help
list
logout
login u/test p/pass
Press "Up" arrow key
Expected: Should only be able to access history up to the 2ndlogin u/test p/pass. ie. user cant seehelpandlist. -
Other test cases: Any other combinations of commands entered after login. Check history after a logout and login.
Expected: Should not be able to access history from the previous login session.
-
H.3. Multi-user feature
H.3.1. Creating a user
-
Creating a user.
-
Prerequisites: No such user with username "test" exists.
-
Test Case:
create-user u/TeSt p/pass
Expected: User with username "test" and password "pass" is created. Success message shown. -
Test Case:
create-user u/test p/pass
Expected: No user created. Error message that username already exists is shown. -
Test Case (Username contains spaces) :
create-user u/test test p/pass
Expected: No user created. Error message that username format is wrong. -
Test Case (Password contains spaces) :
create-user u/test p/pass pass
Expected: No user created. Error message that username format is wrong. -
Test case:
login u/test p/pass
Expected: Login is successful with a sample patient address book loaded.
-
H.3.2. Deleting a user
-
Deleting a user.
-
Prerequisites: An existing user (with username: "test" and password: "pass") created. User is logged out from the application.
-
Test Case:
delete-user u/TeSt p/pass
Expected: User is deleted. Success message shown. -
Test Case:
login u/test p/pass
Expected: Login unsuccessful. Error message shown in status message. Login status bar unchanged. -
Test Case (No double deletion) :
delete-user u/test p/pass
Expected: No user is deleted. Error message that username and password may be wrong. -
Test case (User not existent) :
login u/hello p/pass
Expected: No user is deleted. Error message that username and password may be wrong.
-
H.3.3. Changing a user’s password
-
Changing a user.
-
Prerequisites: An existing user (with username: "test" and password: "pass") created. User is logged out from the application.
-
Test Case:
change-user-password u/TeSt p/pass newp/password
Expected: User password is changed. Success message shown. -
Test Case:
login u/test p/pass
Expected: Login unsuccessful. Error message shown in status message. Login status bar unchanged. -
Test Case:
login u/test p/password
Expected: Login successful and GUI displays UI panels. Login successful in status message. Login status bar changes to green and displays login details. -
Test Case (Wrong password input):
change-user-password u/test p/wrongpassword newp/password
Expected: No user password is changed. Error message that username and password may be wrong.
-
H.3.4. Dissociation of User’s Address Book
-
Checking different users have different address books.
-
Prerequisites: Two existing user (User 1: u: "test" and p: "pass", User 2: u :"test2" and p: "pass2") created.
-
Test Case:
login u/test p/pass
add n/John Doe p/98765432 e/johnd@example.com a/John street, block 123, #01-01
logout
login u/test2 p/pass2
Expected: In usertest2account, the person list panel does not containJohn Doe. In file pathdata/, one should observe that each user have their own addressbook data file too. (If data file missing, it means no edits have been done to the user’s AddressBook yet.)
-
H.4. Session Reports and Logs
H.4.1. Add session report
-
Add a session report to a existing person while all persons are listed
-
Prerequisites: List all persons using the
listcommand. Multiple persons in the list. -
Test case:
add-log 1 log/test session log
Expected: Session log will be added to the first person in the list. Success Message shown. Date & Time Stamp included in the session log. -
Test case:
add-log 0 log/test session log
Expected: No session report will be added. Error details shown in the status message. -
Other incorrect add-log commands to try:
add-log,add-log x log/test log(where x is larger than the list size)
Expected: Similar to previous.
-
H.5. Deleting a person
-
Deleting a person while all persons are listed
-
Prerequisites: List all persons using the
listcommand. Multiple persons in the list. -
Test case:
delete 1
Expected: First contact is deleted from the list. Details of the deleted contact shown in the status message. Timestamp in the status bar is updated. -
Test case:
delete 0
Expected: No person is deleted. Error details shown in the status message. Status bar remains the same. -
Other incorrect delete commands to try:
delete,delete x(where x is larger than the list size) {give more}
Expected: Similar to previous.
-
{ more test cases … }
H.6. Saving data
-
Dealing with missing/corrupted data files
-
{explain how to simulate a missing/corrupted file and the expected behavior}
-
{ more test cases … }
H.7. Calendar Tools
-
Displaying the calendar within a WebView
-
Notes: The signed in user within the WebView is not linked to the Oauth certificate. See the Calendar Quick Start in the UserGuide.adoc for more information.
-
Test case:
calendar-launchand not logged in
Expected: Error log command states that you must be logged in to use the command. -
Test case:
View > Open Calendarand not logged in
Expected: Calendar WebView opens and states that you must be logged in to use the feature. -
Test case: Press
F8and not logged in
Expected: Calendar WebView opens and states that you must be logged in to use the feature. -
Test case:
calendar-launchand logged in
Expected: Calendar WebView opens and the calendar is displayed (if not signed in to a Google Calendar account, the user will be prompted to sign in). -
Test case:
View > Open Calendarand logged in
Expected: Calendar WebView opens and the calendar is displayed (if not signed in to a Google Calendar account, the user will be prompted to sign in). -
Test case: Press
F8and logged in
Expected: Calendar WebView opens and the calendar is displayed (if not signed in to a Google Calendar account, the user will be prompted to sign in). -
Test case:
logoutwith open calendar WebViews open (one or many)
Expected: All calendar windows close and user is logged out from signed-in calendar sessions (verify by logging as any user).
-
-
Displaying the calendar within the scene switcher
-
Notes: The signed in user within the Calendar scene is not linked to the Oauth certificate. See the Calendar Quick Start in the UserGuide.adoc for more information.
-
Test case:
switch calendarand not logged in
Expected: Switch case states that you must be logged in to use the command. -
Test case:
switch calendarand logged in
Expected: Scene is switched to display the calendar (if not signed in to a Google Calendar account, the user will be prompted to sign in). -
Test case:
logoutand logged in
Expected: User is signed out from the calendar scene session (verify by logging in as any user).
-
-
Reauthenticating Oauth certificate for calendar use
-
Notes: The signed in user within the Calendar scene is not linked to the Oauth certificate. See the Calendar Quick Start in the UserGuide.adoc for more information.
-
Test case:
reauthenticateand not logged in
Expected: Reauthenticate command states that you must be logged in to use the command. -
Test case:
reauthenticateand logged in
Expected: System default browser is launched and user is asked to select an account to authenticate the SLAP app to manage. Failure to do so will freeze the application. Once permission has been granted, a test event will be added and deleted.
-
-
Adding a calendar event
-
Notes: The signed in user within the Calendar scene is not linked to the Oauth certificate. See the Calendar Quick Start in the UserGuide.adoc for more information.
-
Prerequisites: User is logged in and has authenticated SLAP via Oauth. See the Calendar Quick Start in the UserGuide.adoc for more information.
-
Test case:
calendar-addand not logged in
Expected: calendar-add command states that you must be logged in to use the feature. -
Test case:
calendar-addand logged in
Expected: calendar-add will detect missing parameters and inform the user how to use the feature. -
Test case:
calendar-add title/Some Eventand logged in (i.e. missing start/DATETIME and/or end/DATETIME flag)
Expected: calendar-add will detect missing parameters and inform the user how to use the feature. -
Test case:
calendar-add title/Test Event start/ end/and logged in (i.e. missing start/ and/or end/ flag input) +
Expected: Nothing will happen (no feedback to user — will be fixed in v2.0). -
Test case:
calendar-add title/CS2103 Tutorial start/This Thursday at 3PM end/4PM on Thursdayand logged in (i.e. missing loc/LOCATION flag)
Expected: If user does not have a valid Oauth certificate, the system default browser is launched and asks the user to select an account to authorize the SLAP app to manage. Failure to do so will freeze the application. calendar-add command will add event to authorized Google Calendar and show the user the event details with a link to the event. -
Test case:
calendar-add title/CS2103 Tutorial start/This Thursday at 3PM end/4PM on Thursday loc/NUS School of Computing, COM1, 13 Computing Drive, Singapore 117417and logged in
Expected: If user does not have a valid Oauth certificate, the system default browser is launched and asks the user to select an account to authorize the SLAP app to manage. Failure to do so will freeze the application. calendar-add command will add event to authorized Google Calendar and show the user the event details with a link to the event.
-
-
Listing upcoming calendar events in the command results box
-
Notes: The signed in user within the Calendar scene is not linked to the Oauth certificate. See the Calendar Quick Start in the UserGuide.adoc for more information.
-
Prerequisites: User is logged in and has authenticated SLAP via Oauth. See the Calendar Quick Start in the UserGuide.adoc for more information.
-
Test case:
calendar-listand not logged in + h Expected: calendar-list command states that you must be logged in to use the feature. -
Test case:
calendar-listand logged in
Expected: If user does not have a valid Oauth certificate, the system default browser is launched and asks the user to select an account to authorize the SLAP app to manage. Failure to do so will free the application. Assuming a valid certificate is obtained, if the user has any upcoming events, they will be displayed (up to 250). Otherwise, the command will state that no upcoming events were found.
-
-
Deleting a calendar event
-
Notes: The signed in user within the Calendar scene is not linked to the Oauth certificate. See the Calendar Quick Start in the UserGuide.adoc for more information.
-
Prerequisites: List all upcoming events using the
calendar-listcommand or list events for a particular say usingshow-schedule d/DATE. A non-zero amount of events is required in either case. -
Prerequisites: User is logged in and has authenticated SLAP via Oauth. See the Calendar Quick Start in the UserGuide.adoc for more information.
-
Test case:
calendar-delete 1and not logged in
Expected: calendar-list command states that you must be logged in to use the feature. -
Test case:
calendar-delete 1and logged in and neithercalendar-listnorshow-schedulehas been run
Expected: Nothing will happen. -
Test case:
calendar-delete 1and logged in andcalendar-listnorshow-schedulehas been run but no events are displayed+ Expected: calendar-delete command will throw an invalid index exception and inform the user of the proper command usage. -
Test case:
calendar-delete 1and logged in andcalendar-listnorshow-schedulehas been run and a non-zero number of events are displayed+ Expected: calendar-delete command will delete the event at index 1 and inform the user of the deleted event. -
Test case:
calendar-delete 5and logged in andcalendar-listnorshow-schedulehas been run and a non-zero, but less than 5, number of events are displayed+ Expected: calendar-delete command will delete an invalid index exception and inform the user of the proper command usage.
-
-
Display the user’s events for a particular day in the command results box
-
Notes: The signed in user within the Calendar scene is not linked to the Oauth certificate. See the Calendar Quick Start in the UserGuide.adoc for more information.
-
Prerequisites: User is logged in and has authenticated SLAP via Oauth. See the Calendar Quick Start in the UserGuide.adoc for more information.
-
Test case:
show-schedule d/May 5
Expected: If there are calendar events for this date, they will be displayed. Otherwise, a message will inform the user that there are no events for this day. -
Test case:
show-schedule d/On Tuesday
Expected: If there are calendar events for this date, they will be displayed. Otherwise, a message will inform the user that there are no events for this day. -
Test case:
show-schedule
Expected: Display invalid command format and display correct command usage. -
Test case:
show-schedule d/May 5 after 2PMExpected: Ignores the time; If there are calendar events for this date at any time, they will be displayed. Otherwise, a message will inform the user that there are no events for this day.
-
-
Displaying the error log within a WebView
-
Test case:
errorlogand not logged in
Expected: Error log command states that you must be logged in to use the command. -
Test case:
View > Show Error Logand not logged in
Expected: Error log WebView opens and states that you must be logged in to use the feature. -
Test case:
errorlogand logged in
Expected: Error log WebView opens and the error log is displayed. -
Test case:
View > Show Error Logand logged in
Expected: Error log WebView opens and the error log is displayed. -
Test case:
logoutwith open error logs WebViews open (one or many)
Expected: All error log windows close.
-
H.8. UI Features and Map Components
H.8.1. Switching features
-
Switching between feature tabs through Command Line Interface.
-
Prerequisites: Already logged in.
-
Test Case:
switch scheduler
Expected: UI switches scenes to display daily scheduler feature. Success message shown. -
Test Case (Switch to same feature) :
switch scheduler
Expected: No changes to UI. Success message shown. -
Test Case (Wrong name) :
switch detail
Expected: No changes to UI. Error message that feature target name is wrong. -
Test Case (Number used) :
switch 1
Expected: No changes to UI. Error message that feature target name is wrong.
-
H.8.2. Selecting persons will display updated UI
-
Updates to Map Panel.
-
Prerequisites: Already logged in and on
Detailsfeature. Person selected has a valid address. -
Test Case:
select 1
Expected: UI updates to display first indexed person’s address on the map. -
Test Case:
select 2
Expected: UI updates to display second indexed person’s address on the map. -
Prerequisites: Added a person with bad address such as
a/huhhuh. For this example, imagine person index is 10. -
Test Case (Select person with unrecognisable address) :
select 10
Expected: Map Panel updates to show that Google could not retrieve address.
-
-
Updates to Session Log Panel.
-
Prerequisites: Already logged in and on
Detailsfeature. -
Test Case:
select 1
Expected: UI updates to display first indexed person’s session log. -
Test Case:
select 2
Expected: UI updates to display second indexed person’s session log. -
Test Case:
add-log 1 log/TEST
Expected: Selects first indexed person and updates UI to display that person’s details including session log.
-
H.8.3. Show-schedule updates list of scheduled events shown
-
Updates to Events List Shown.
-
Prerequisites: Already logged in and on
Schedulerfeature. Date chosen, eg. 5 May and 6 May, already have at least 1 event scheduled. -
Test Case:
show-schedule d/5 May
Expected: UI updates to show information of events scheduled on 5 May. -
Test Case (Select different date with valid number of events):
show-schedule d/6 May
Expected: UI updates to show information of events scheduled on 6 May. -
Prerequisites: Date, eg. 7 May chosen has no scheduled events planned.
-
Test Case (Select different date with no events):
show-schedule d/7 May
Expected: UI updates to show prompt informing user to add events or select a date with events.
-
-
Updates to Navigation Option Indicators
-
Prerequisites: Date chosen, eg. 8 May have at 5 events scheduled.
-
Test Case:
show-schedule d/8 May
Expected: UI updates to display to show 4 buttons next to map panel. -
Prerequisites: Date chosen, eg. 9 May only have 1 event scheduled.
-
Test Case (Not enough events):
show-schedule d/9 May
Expected: UI updates to not display any buttons.
-
H.8.4. Navigate command updates Daily Scheduler Map Panel
-
Updates to Daily Scheduler Map Panel.
-
Prerequisites: Already called show-schedule for a date with sufficient events, i.e. 2 or more events.
-
Test Case:
navigate 1
Expected: UI refreshes to display directions between event 1 and 2. Message success will be shown.
-
H.8.5. UI updates on Log Out and Log In
-
Updates to Details Panel.
-
Prerequisites: Logged in, carried out a few commands and current view is details feature.
-
Test Case:
logout + login u/user p/pass
Expected: UI refreshes to not display any persons details.
-
-
Updates to Daily Scheduler Panel.
-
Prerequisites: Logged in, carried out a few commands and current view is daily scheduler feature.
-
Test Case:
logout + login u/user p/pass
Expected: UI refreshes to not display any events or directions or indicators.
-